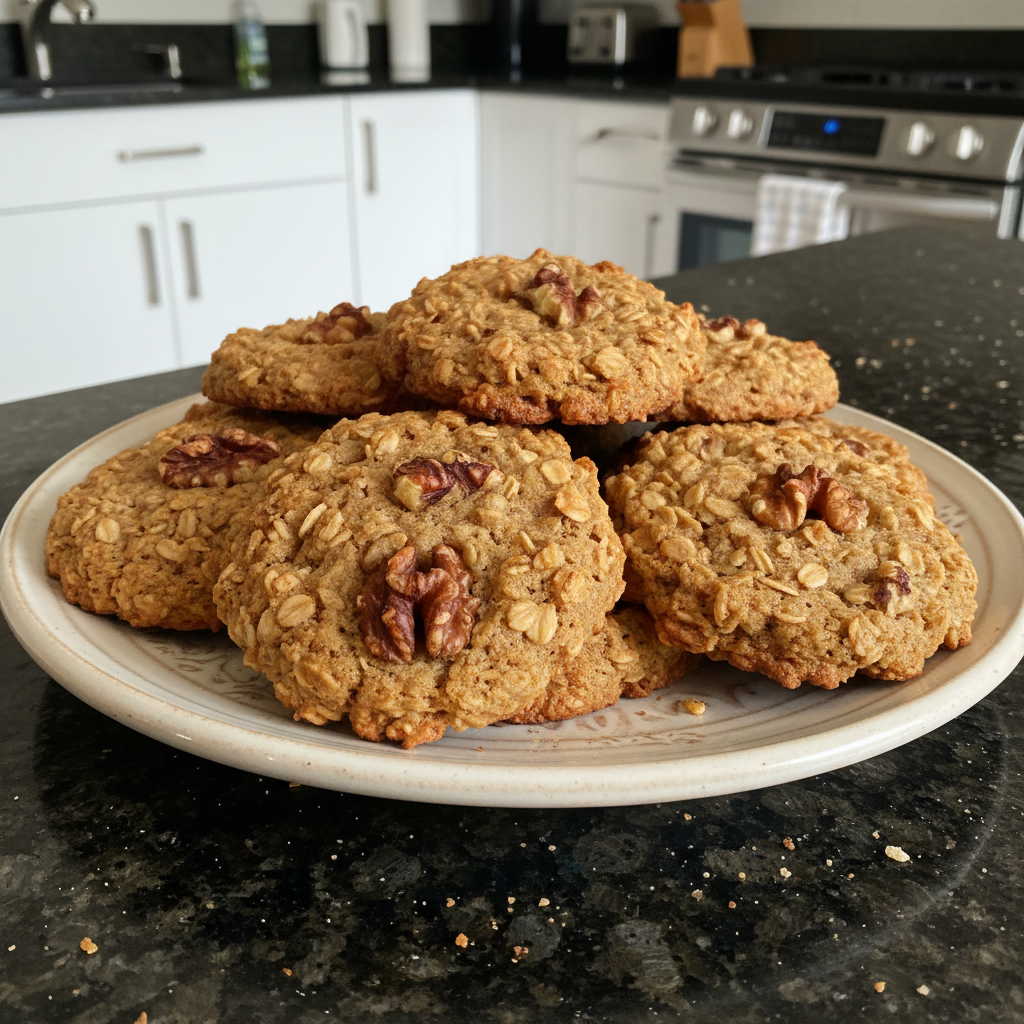
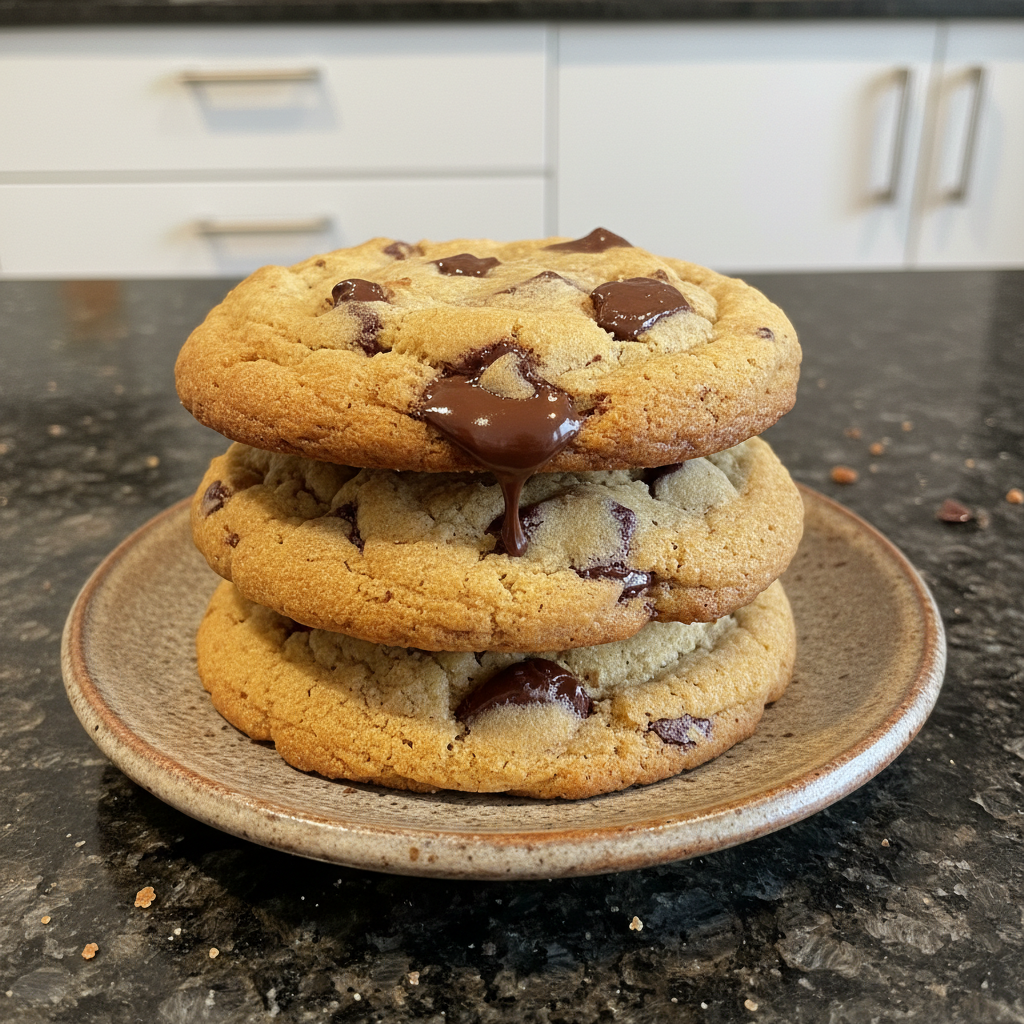
We’ve all been there: the intense craving for a perfectly baked chocolate chip cookie. But how often are we met with disappointment? Cookies that are too flat, too hard, or just lacking that special something. This recipe for Soft and Chewy Chocolate Chip Cookies solves all those problems. It’s designed for home bakers of all levels, promising ease and guaranteed delicious results. Get ready to learn how to make exceptionally soft and chewy chocolate chip cookies with a simple, unique twist that elevates both the flavor and texture.
Why You’ll Love This Chewy Chocolate Chip Cookies Recipe
These aren’t just any chocolate chip cookies; they’re an experience. I’ve perfected this recipe over years, and I’m excited to share the secret.
The Secret Ingredient: The addition of just 1-2 teaspoons of molasses is the key to the cookies’ exceptional chewiness and rich flavor.
Molasses Magic: Molasses contains invert sugar, which helps the cookies retain moisture. This results in a wonderfully soft texture. It also adds a subtle depth of flavor that perfectly complements the brown sugar.
Comfort in Every Bite: These cookies are pure comfort food, perfect for sharing with family and friends or enjoying as a special treat just for yourself.
Easy and Reliable: This recipe is incredibly easy to follow and yields consistently perfect results every single time. Plus, you can chill the dough in advance, allowing for flexible baking whenever the craving hits.
Ingredients Needed
Here’s everything you’ll need to bake these amazing cookies:
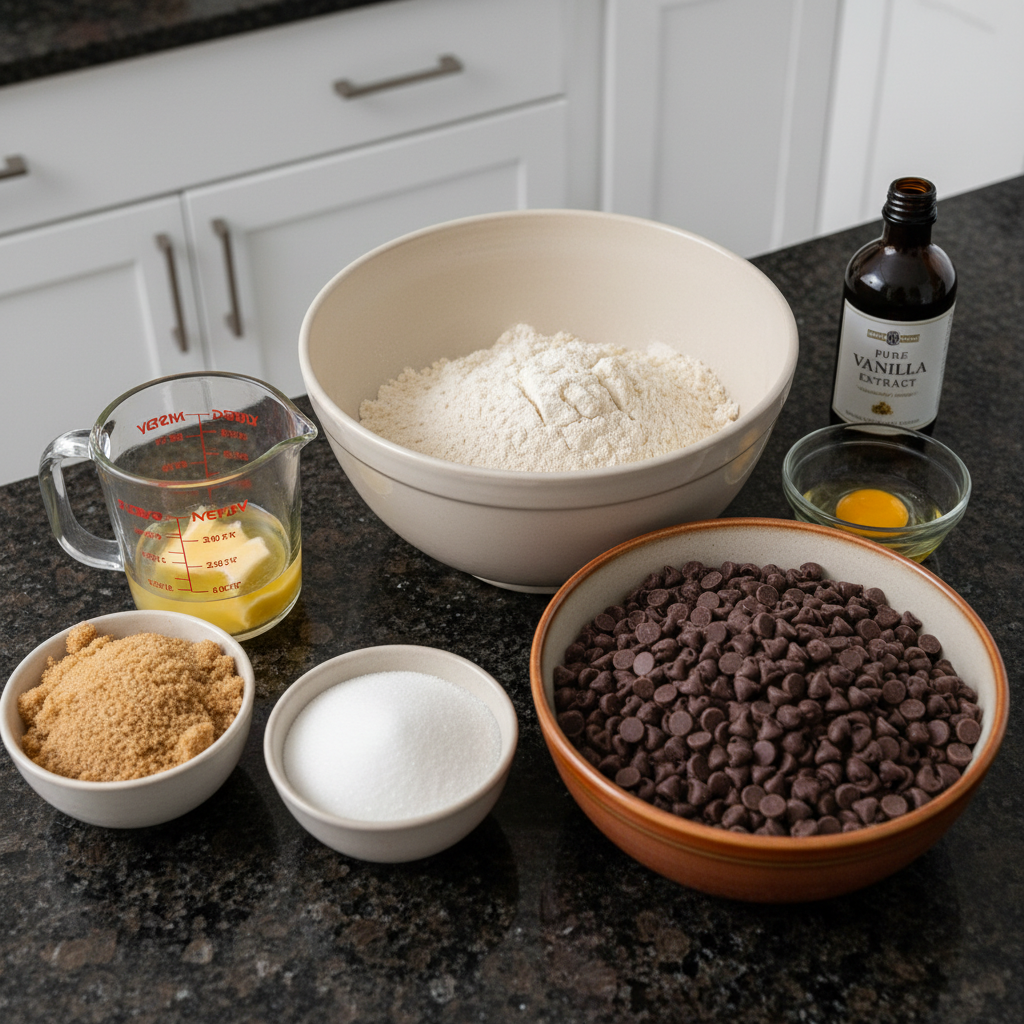
2 and 1/4 cups (281g) all-purpose flour (spooned & leveled)
1 teaspoon baking soda
1 and 1/2 teaspoons cornstarch*
1/2 teaspoon salt
3/4 cup (170g/12 Tbsp) unsalted butter, melted & cooled for 5 minutes
3/4 cup (150g) packed light or dark brown sugar
1/2 cup (100g) granulated sugar
1 large egg + 1 egg yolk, at room temperature
2 teaspoons pure vanilla extract
1 and 1/4 cups (225g) semi-sweet chocolate chips or chocolate chunks
Ingredient Notes & Substitutions
Flour: Measuring flour correctly is crucial for success. Always spoon the flour into your measuring cup and level it off with a knife. This prevents using too much flour, which can lead to dry cookies. For gluten-free Soft and Chewy Chocolate Chip Cookies, use a high-quality gluten-free all-purpose blend. This is important for gluten development and hydration.
Butter: I recommend using high-quality unsalted butter for the best flavor. If you only have salted butter, reduce the amount of salt in the recipe by 1/4 teaspoon. Make sure the melted butter has cooled slightly for about 5 minutes. This will prevent the eggs from cooking when added.
Sugar: Both brown sugar and granulated sugar play important roles in the texture and flavor of these cookies. Brown sugar adds moisture and chewiness, while granulated sugar contributes to crispness. Use light or dark brown sugar based on your preference. Dark brown sugar has a more intense molasses flavor.
Chocolate: The type of chocolate you use will significantly impact the final product. Semi-sweet chocolate chips or chocolate chunks are my go-to, but feel free to experiment! You can use dark chocolate for a richer flavor or even white chocolate chips, peanut butter chips, or butterscotch morsels for a fun twist.
How to Make Soft and Chewy Chocolate Chip Cookies
Follow these simple steps to create cookie perfection in your own kitchen.
Step 1: Combine Dry Ingredients
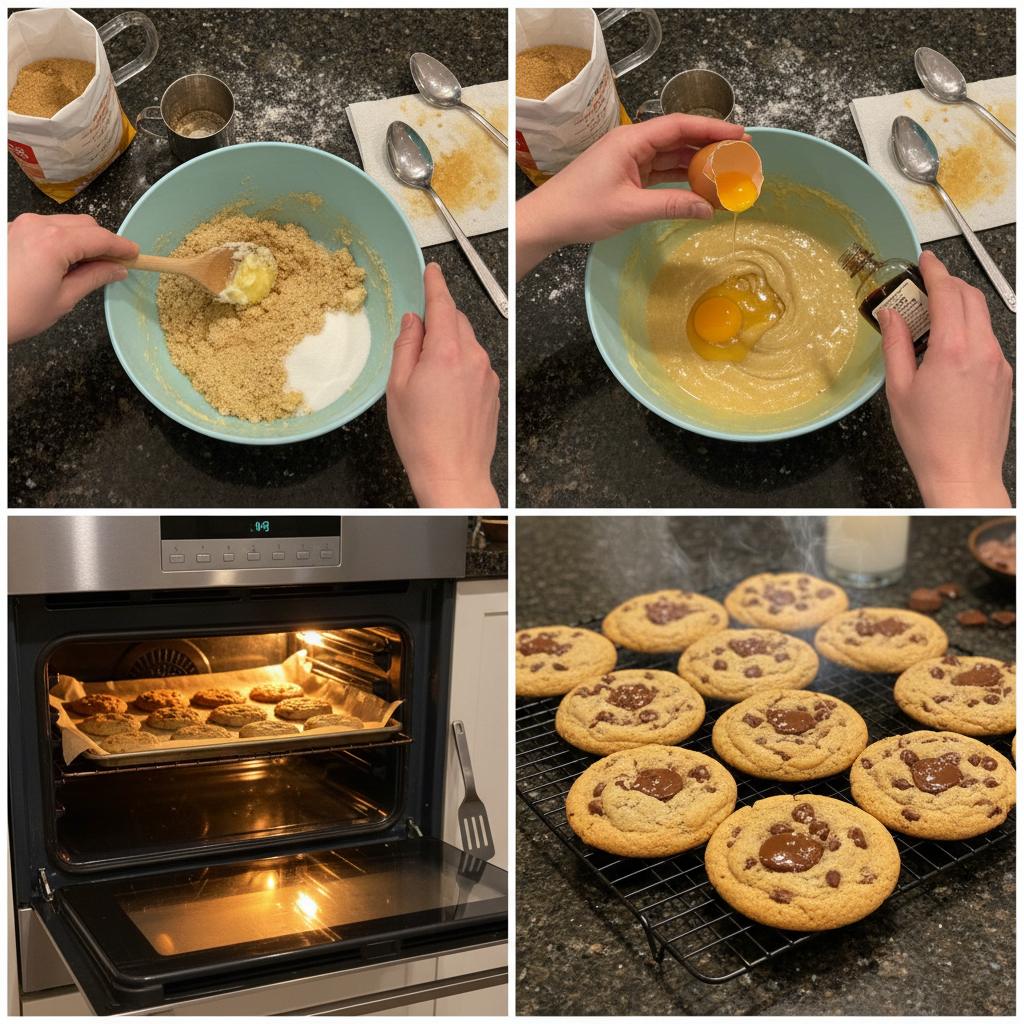
In a large bowl, whisk together the 2 and 1/4 cups all-purpose flour, 1 teaspoon baking soda, 1 and 1/2 teaspoons cornstarch, and 1/2 teaspoon salt. Make sure to whisk thoroughly to evenly distribute the baking soda, cornstarch, and salt. This ensures a consistent texture throughout the cookies. Set the bowl aside.
Step 2: Cream Wet Ingredients
In a medium bowl, whisk together the 3/4 cup melted butter, 3/4 cup packed brown sugar, and 1/2 cup granulated sugar until no lumps remain. You’ll notice the mixture becoming smooth and homogenous. Whisk in the 1 large egg and 1 egg yolk until combined, then whisk in the 2 teaspoons vanilla extract. The mixture will be thin and have a lovely vanilla aroma.
Step 3: Combine Wet and Dry Ingredients
Pour the wet ingredients into the dry ingredients and mix together with a large spoon or spatula. The dough will be very soft, thick, and shiny. Fold in the 1 and 1/4 cups chocolate chips. The chocolate chips may not stick to the dough easily because of the melted butter, but do your best to combine them evenly throughout.
Step 4: Chill the Dough
Cover the dough tightly and refrigerate for at least 2 hours or up to 3 days. I highly recommend chilling the cookie dough overnight to prevent overspreading. Chilling allows the flavors to meld together and the gluten to relax. If you’re short on time, a minimum of 2 hours is sufficient, but longer chilling will yield even better results.
Step 5: Preheat and Prepare
Preheat oven to 325°F (163°C). Line large baking sheets with parchment paper or silicone baking mats. If the dough has chilled for longer than 2 hours, let it sit at room temperature for about 15 minutes to make it easier to scoop.
Step 6: Scoop and Shape
Using a cookie scoop or Tablespoon measuring spoon, scoop the chilled cookie dough. For XL cookies, use about 3 scant Tablespoons (about 2 ounces, or 60g) of dough. For medium-large cookies, use 2 heaping Tablespoons (about 1.75 ounces, or 50g) of dough. Roll into a ball, then use your fingers to shape the cookie dough so that it’s taller rather than wide—almost like a cylinder. Shaping them tall will help the cookies bake up thicker. Repeat with remaining dough. Arrange the cookies 3 inches apart on the prepared baking sheets.
Step 7: Bake
Bake the cookies for 13–14 minutes or until the edges are very lightly browned. The centers will look very soft, but the cookies will continue to set as they cool. Keep a close eye on them during the last few minutes to prevent overbaking.
Step 8: Cool and Serve
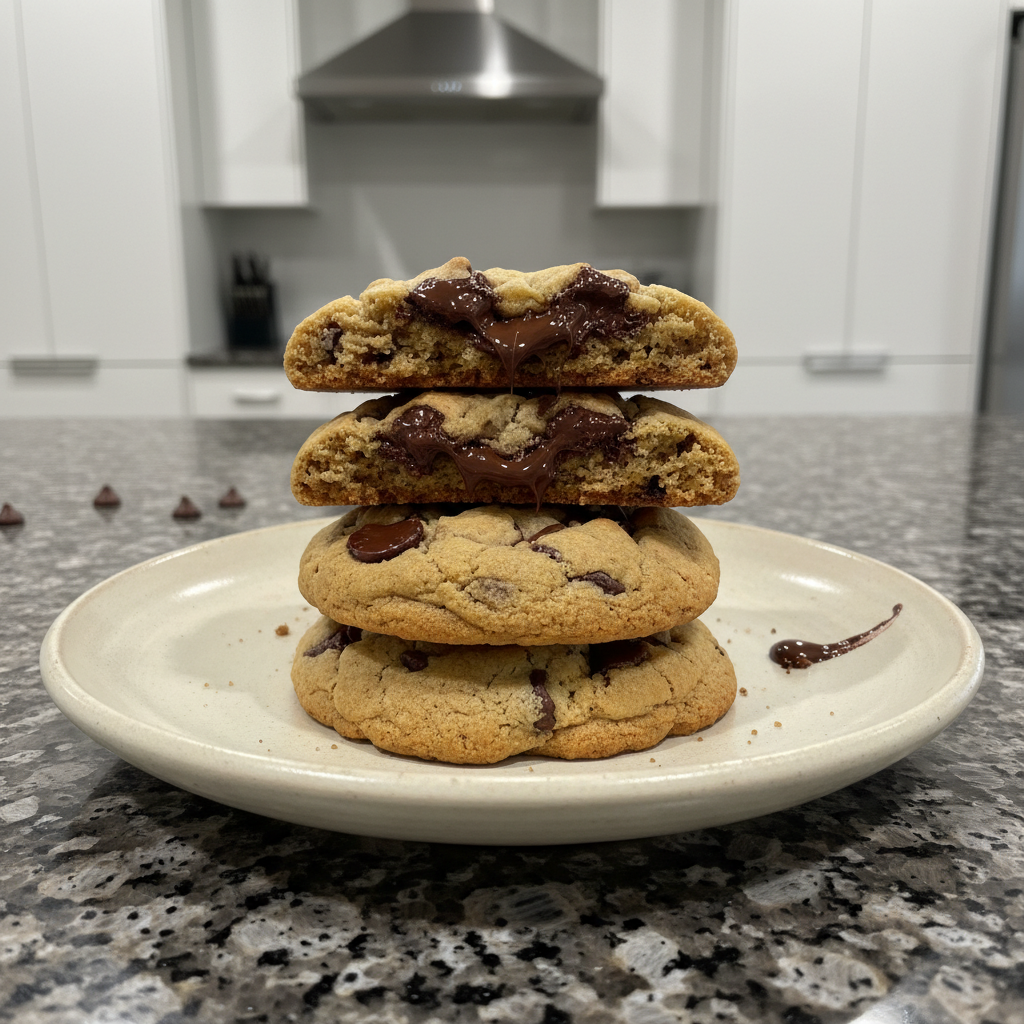
Cool the cookies on the baking sheet for 10 minutes before transferring them to a cooling rack to cool completely. While the cookies are still warm, I like to press a few more chocolate chips into the tops—this is optional and only for looks. Store the cookies tightly covered at room temperature for up to 1 week to maintain their soft texture.
The Science of Soft Cookies
Ever wondered what makes a cookie soft and chewy? It’s not just magic; it’s science!
The Maillard Reaction: This chemical reaction between amino acids and reducing sugars gives cookies their golden-brown color and complex flavor. Higher baking temperatures accelerate the Maillard reaction. Understanding the Maillard reaction is critical to baking the perfect cookie.
The Magic of Cornstarch: Cornstarch inhibits gluten formation in the dough. Less gluten means a more tender, less tough cookie.
Butter’s Role: Using melted butter, as opposed to creaming softened butter, results in a chewier cookie. The melted butter creates a denser dough that spreads less during baking.
Pro Tips & Troubleshooting
Pro Tips
- Chill the dough for at least 2 hours (or overnight) for optimal texture and to prevent overspreading.
- Roll the cookie dough balls extra tall to encourage thickness.
- Press extra chocolate chips into the tops of the cookies while they’re still warm for visual appeal.
- Use a cookie scoop for consistent size and even baking.
- Don’t overbake the cookies; they should be slightly soft in the center.
- Experiment with different types of chocolate chips or chunks.
- The secret twist: Don’t skip the molasses, which guarantees the ultimate chewy texture!
Common Mistakes to Avoid
- Not chilling the dough sufficiently, resulting in flat cookies.
- Overmixing the dough, leading to tough cookies.
- Inaccurate measuring of flour, causing the dough to be too dry or wet.
- Using butter that is too warm or too cold.
- Overbaking the cookies, leading to dry and crumbly cookies.
Serving & Storage
Serving Ideas
- Serve warm with a glass of milk or a scoop of vanilla ice cream.
- Enjoy as an afternoon treat or dessert.
- Use in ice cream sandwiches.
- Pair with coffee or tea.
Storage and Make-Ahead
Store tightly covered at room temperature for up to 1 week to maintain the soft texture. For longer storage, you can freeze the cookie dough. Scoop the dough into balls and place them on a baking sheet lined with parchment paper. Freeze for 1-2 hours, or until solid, then transfer to a freezer-safe bag or container. The cookie dough can be frozen for up to 3 months. To bake from frozen, simply add 1-2 minutes to the baking time.
Conclusion
These Soft and Chewy Chocolate Chip Cookies are truly special. The addition of molasses gives them an unmatched depth of flavor and chewiness. I am confident that even beginner bakers can achieve perfect results with this easy-to-follow recipe. Don’t be afraid to experiment with different chocolate variations or serving ideas to make them your own. Print this recipe or share it with your friends – cookie happiness is meant to be spread!
Craving more delightful treats? You might also enjoy these red velvet oreo cookies!
FAQ
Here are some common questions about making these cookies:
Why do I need to chill the dough? Chilling the dough prevents the cookies from overspreading during baking. It also allows the flavors to meld together and the gluten to relax, resulting in a more tender cookie.
What does cornstarch do in this recipe? Cornstarch inhibits gluten development, which leads to a more tender cookie. It also helps to absorb excess moisture, preventing the cookies from becoming too thin or greasy.
How can I make these cookies extra chewy? The molasses, chilling time, and melted butter are all key factors for chewiness. Don’t skip any of these steps!
Can I freeze the cookie dough? Yes, you can! Scoop the dough into balls and freeze them on a baking sheet. Once frozen solid, transfer them to a freezer bag. Bake from frozen, adding 1-2 minutes to the baking time.
How do I store these cookies to maintain their texture? Store the cookies in an airtight container at room temperature. This will help to keep them soft and chewy for up to a week.
What can I substitute for vanilla extract? Almond extract or maple extract can be used as substitutes for vanilla extract. Keep in mind, the molasses will add a unique flavor that can play well with those extracts.
Can I use a different type of flour? Yes, but different flours will affect the texture. Bread flour will result in a chewier cookie, while cake flour will create a more tender cookie. If substituting, you may need to adjust the amount of liquid in the recipe.
What causes cookies to spread too much? Common causes of overspreading include not chilling the dough, using too much butter, or baking at too low of a temperature. High altitude can also contribute to overspreading. Adjusting the flour ratio or chilling time can help. For another delectable cookie recipe, try these strawberry shortcake cookies, they are buttery soft and full of flavor!
To better understand the Maillard reaction and how it affects the color and flavor of baked goods, explore this resource.
Also, for details on different types of flour and their effect on baking, King Arthur Baking provides a comprehensive guide.
Soft & Chewy Chocolate Chip Cookies
Ingredients
Equipment
Method
- In a large bowl, whisk together the 2 and 1/4 cups all-purpose flour, 1 teaspoon baking soda, 1 and 1/2 teaspoons cornstarch, and 1/2 teaspoon salt. Make sure to whisk thoroughly to evenly distribute the baking soda, cornstarch, and salt. Set the bowl aside.
- In a medium bowl, whisk together the 3/4 cup melted butter, 3/4 cup packed brown sugar, and 1/2 cup granulated sugar until no lumps remain. Whisk in the 1 large egg and 1 egg yolk until combined, then whisk in the 2 teaspoons vanilla extract.
- Pour the wet ingredients into the dry ingredients and mix together with a large spoon or spatula. Fold in the 1 and 1/4 cups chocolate chips.
- Cover the dough tightly and refrigerate for at least 2 hours or up to 3 days. Chilling allows the flavors to meld together and the gluten to relax.
- Preheat oven to 325°F (163°C). Line large baking sheets with parchment paper or silicone baking mats. If the dough has chilled for longer than 2 hours, let it sit at room temperature for about 15 minutes to make it easier to scoop.
- Using a cookie scoop or Tablespoon measuring spoon, scoop the chilled cookie dough. Roll into a ball, then use your fingers to shape the cookie dough so that it’s taller rather than wide—almost like a cylinder. Arrange the cookies 3 inches apart on the prepared baking sheets.
- Bake the cookies for 13–14 minutes or until the edges are very lightly browned. The centers will look very soft, but the cookies will continue to set as they cool.
- Cool the cookies on the baking sheet for 10 minutes before transferring them to a cooling rack to cool completely. While the cookies are still warm, I like to press a few more chocolate chips into the tops—this is optional and only for looks. Store the cookies tightly covered at room temperature for up to 1 week to maintain their soft texture.