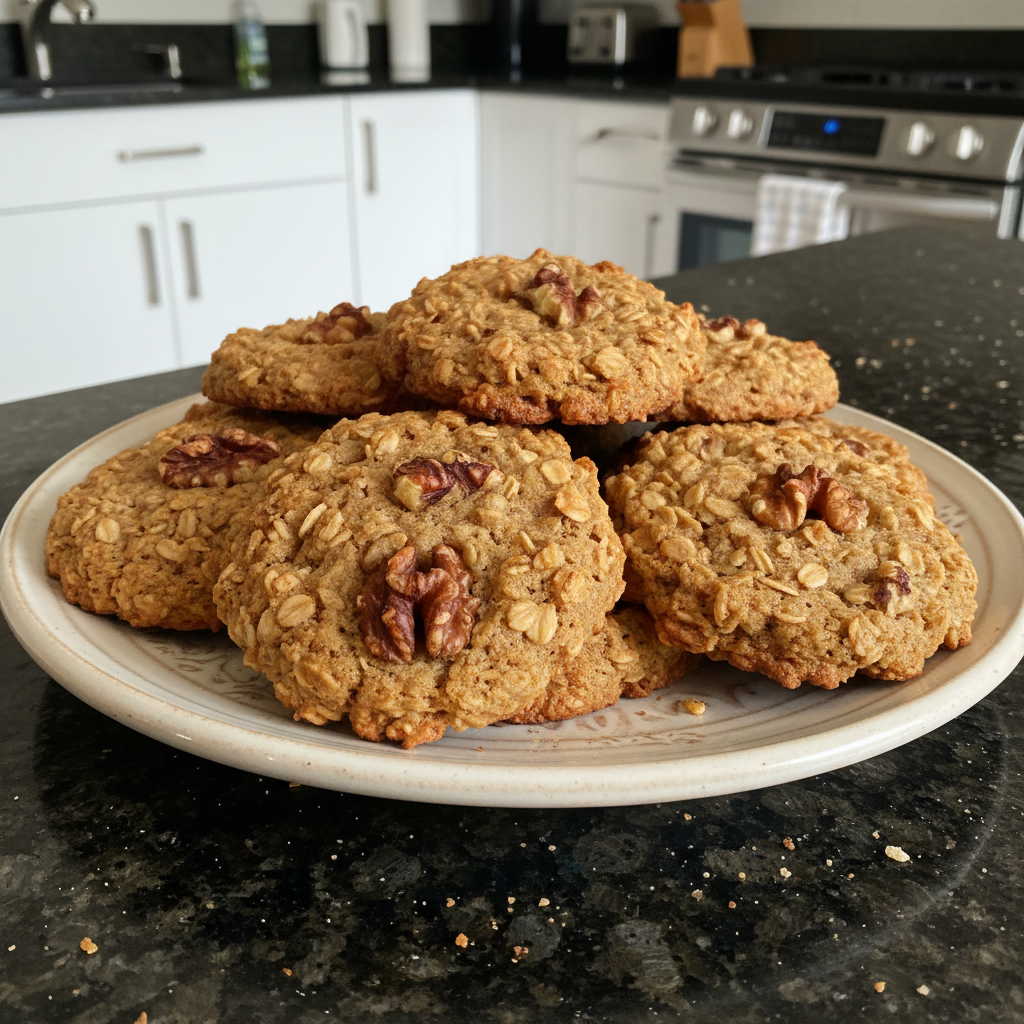
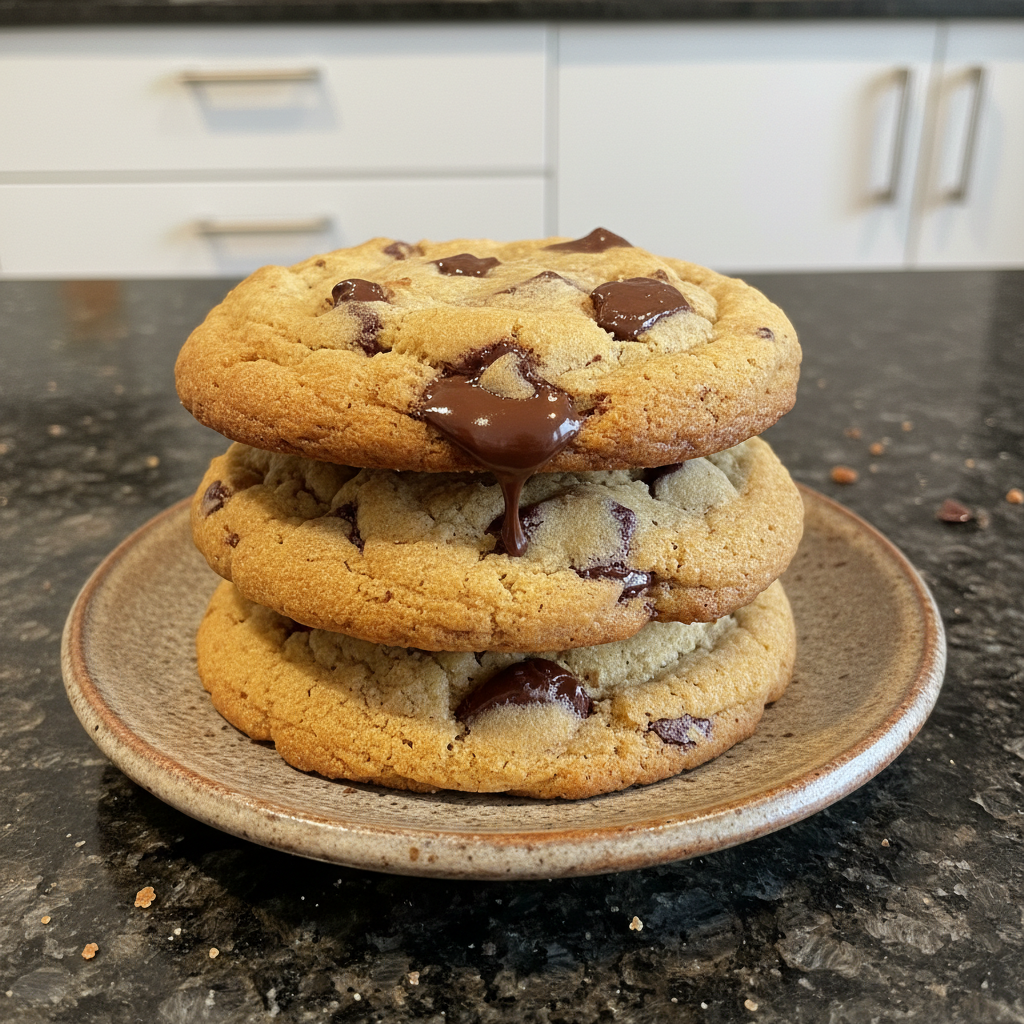
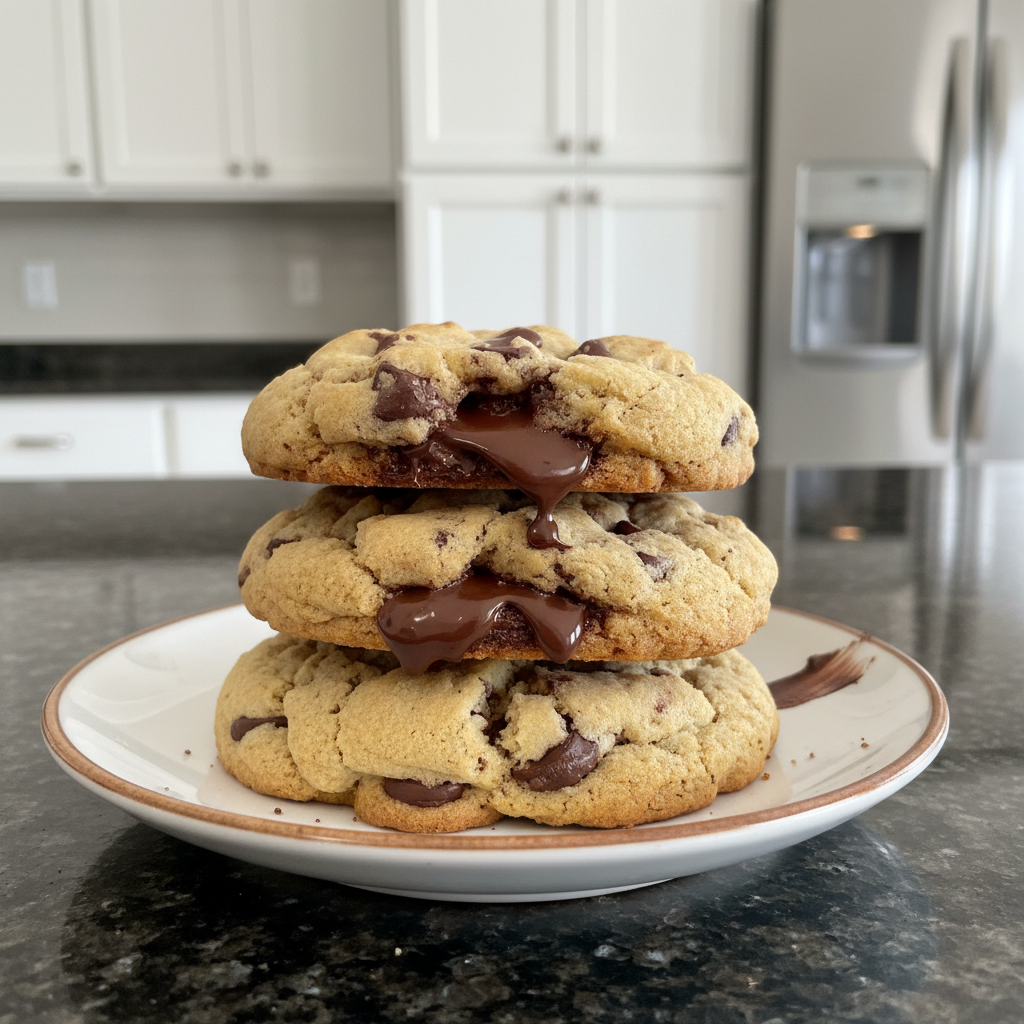
Imagine sinking your teeth into a perfectly thick chocolate chip cookie: soft, chewy, and bursting with rich, buttery flavor. These aren’t just any cookies; they’re the ultimate comfort treat made easy in your own kitchen. This recipe for **Thick Chocolate Chip Cookies** uses a simple technique that guarantees bakery-worthy results every time. Get ready to discover the secret to incredibly thick and flavorful cookies with a method that will change your baking game forever.
Why You’ll Love This Cookies Recipe
This recipe features a special approach to classic chocolate chip cookies, ensuring a unique and delightful experience.
Unique Twist: This recipe uses a combination of salted butter and light brown sugar, as well as melted and browned butter to create a nutty, chewy cookie.
Taste: The browned butter elevates the flavor to a whole new level, offering an unmatched nutty and buttery taste that complements the sweetness of the chocolate chips. You will also taste the light brown sugar which lends moisture to the cookie.
Texture: Expect a perfectly thick and chewy cookie, with a slightly gooey center that melts in your mouth. Achieving the perfect thick chocolate chip cookies is easier than you think!
Reliability: With clear, step-by-step instructions, this recipe delivers consistent, impressive results every time, making you a cookie-baking pro in no time.
Ingredients Needed
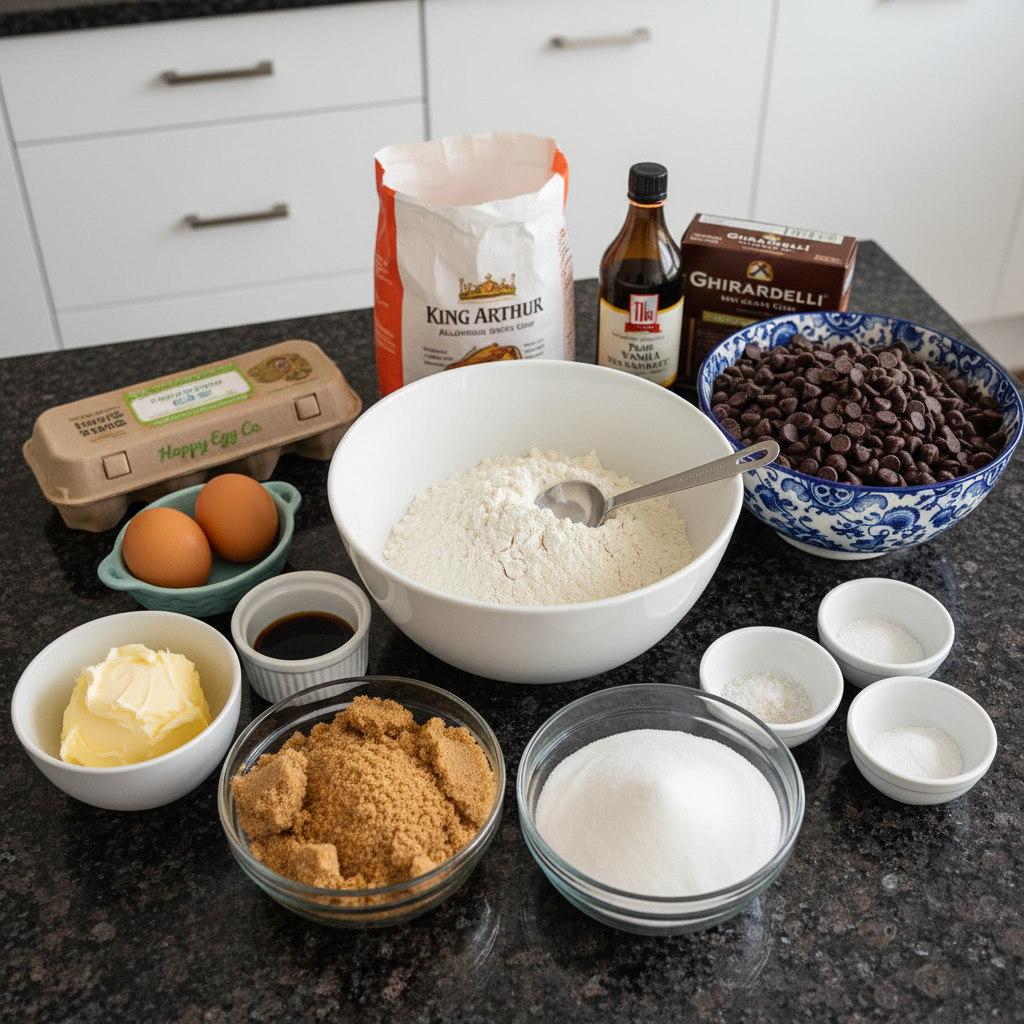
- ½ cup salted butter (room temperature)
- ¾ cup light brown sugar
- ¼ cup white sugar
- 2 large egg
- 1 tablespoon vanilla extract
- 2¼ cups all purpose flour
- ½ teaspoon salt
- 1 teaspoon baking soda
- ½ teaspoon baking powder
- 2 cups semi sweet chocolate chips
Ingredient Notes & Substitutions
Butter: I prefer using salted butter in this recipe as it enhances the overall flavor, but you can substitute with unsalted butter and add an extra pinch (about 1/4 teaspoon) of salt. Make sure the butter is at room temperature for easy creaming.
Sugar: The combination of light brown sugar and white sugar creates the perfect balance of moisture and crispness. The brown sugar adds a lovely chewiness, while the white sugar contributes to the cookies’ slightly crisp edges.
Chocolate Chips: Feel free to get creative with your chocolate! Substitute semi sweet chocolate chips with dark, milk, or even white chocolate chips for a different flavor profile. White chocolate chips can be especially delicious.
Gluten-Free Option: To make these thick chocolate chip cookies gluten-free, use a high-quality gluten-free all-purpose flour blend. You may need to add an extra tablespoon of liquid (milk or water) if the dough seems too dry.
How to Make Thick Chocolate Chip Cookies
Follow these simple steps to create the best thick chocolate chip cookies you’ve ever tasted.
Step 1: Prepare the Baking Sheet
Line a large baking sheet with a silicone baking mat. A silicone baking mat ensures even baking and prevents the cookies from sticking. A baking sheet ensures optimal heat distribution.
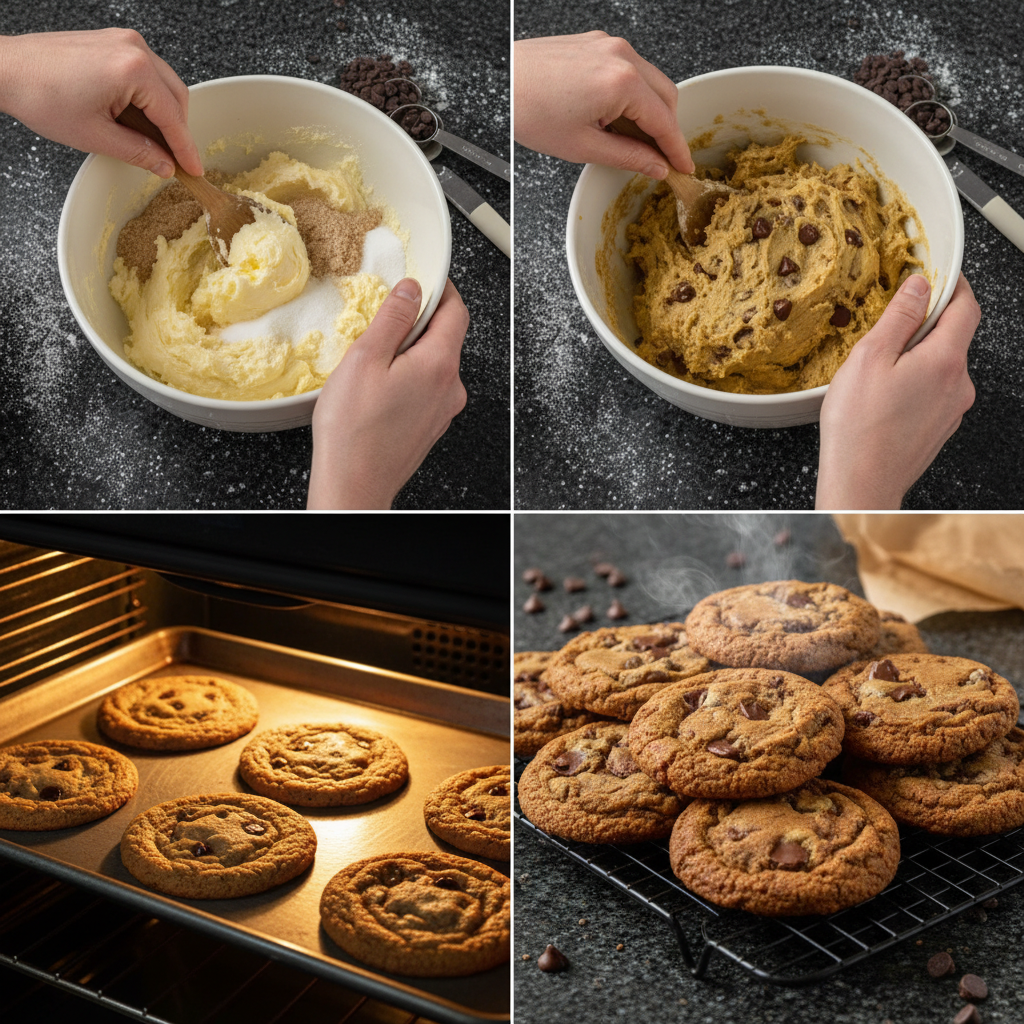
Step 2: Cream Butter and Sugars
In a large mixing bowl, add the softened salted butter, light brown sugar, and white sugar. Using a hand mixer or stand mixer fitted with the paddle attachment, cream the butter and sugars together until light and fluffy. Creaming should take 3-5 minutes. It’s when the mixture becomes pale and airy, a sign that the sugar granules are incorporating air into the butter. Ensure your mixer is powerful enough, or consider creaming in batches.
Step 3: Add Eggs and Vanilla
Add the large eggs and vanilla extract to the creamed mixture. Mix until just combined. The eggs act as a binding agent and add moisture, while the vanilla extract enhances the overall flavor.
Step 4: Add Dry Ingredients
In the same mixing bowl, add the all-purpose flour, baking soda, baking powder, and salt. Mix until the dough is just coming together. It’s okay if the dough seems a little crumbly at this point; that’s normal. Be careful not to overmix, as this can lead to tough cookies.
Step 5: Stir in Chocolate Chips
Gently stir in the semi sweet chocolate chips until they are evenly distributed throughout the dough. You can also fold in other mix-ins like nuts or dried fruit at this stage.
Step 6: Portion the Dough
Divide the dough into 12 or 6 equal portions. If making 12 cookies, each portion should be about 81 grams. For 6 larger, Texas size cookies, divide the dough into 162-gram portions. Use a cookie scoop or a kitchen scale to ensure even sizing.
Step 7: Form Dough Balls
Form each portion of dough into tall, rounded balls. The height of the dough balls contributes to the thickness of the final cookie. We don’t want flat cookies!
Step 8: Chill the Dough
Place the formed dough balls on the prepared baking sheet and refrigerate for at least 30 minutes. Chilling prevents the cookies from spreading too much during baking and also enhances the flavor.
Step 9: Preheat the Oven
Preheat your oven to 375 degrees F (190 degrees C). Make sure the oven rack is in the center position for even baking.
Step 10: Bake the Cookies
Bake the cookies for 10 minutes for smaller cookies or 15 minutes for larger cookies. The cookies are done when the edges are golden brown, and the centers are still slightly soft. Keep an eye on the baking time.
Step 11: Check the Internal Temperature
Check the internal temperature of the cookies using a food thermometer to ensure they have reached 160 degrees F (71 degrees C). This ensures that the cookies are fully baked and safe to eat.
Step 12: Cool on the Pan
Remove the cookies from the oven and let them cool on the baking sheet for at least 10 minutes before transferring them to a wire rack to cool completely. The cookies will continue to set in the center as they cool, resulting in that perfect chewy texture.
Mastering the Melt: Brown Butter Secrets
The secret ingredient in this recipe is melted butter, specifically browned butter. Here’s why it works:
Explain the Maillard Reaction
The Maillard reaction is a chemical reaction between amino acids and reducing sugars that gives browned butter its characteristic nutty flavor and aroma. This reaction occurs when the butter is heated, creating hundreds of new flavor compounds that enhance the taste of the cookies. For more information, you can read about how browning butter works.
How to Brown Butter
To brown butter, melt the butter in a light-colored saucepan over medium heat. As the butter melts, it will foam and bubble. Continue cooking, swirling the pan occasionally, until the butter turns a golden amber color and emits a nutty aroma. Remove from heat immediately to prevent burning. Browned butter is best incorporated when slightly cooled. Be patient, as this can take a few minutes.
The Science of Texture
Melted butter, especially browned butter, inhibits gluten development in the flour. This results in a chewier cookie with a less cake-like crumb, which is exactly what we want in our thick chocolate chip cookies.
Pro Tips & Troubleshooting
Pro Tips
- Use a hand mixer or stand mixer for creaming the butter and sugars for a smooth, consistent dough.
- Form the dough into tall shapes before baking to increase the thickness of the cookies.
- Bake frozen cookie dough balls for an extra minute or two; no need to thaw. Speaking of easy desserts, have you tried these easy Oreo truffles? They’re always a hit!
- Check the internal temperature of the cookies to ensure they have reached a temperature of 160 degrees F.
- Chill the dough for at least 30 minutes (or longer) to prevent excessive spreading.
- Use a silicone baking mat for even baking and easy cleanup.
Common Mistakes to Avoid
- Overmixing the dough leads to tough cookies.
- Using butter that is too warm results in flat cookies.
- Not measuring ingredients accurately can affect the texture.
- Skipping the chilling step causes excessive spreading.
- Baking at the wrong temperature affects browning and texture.
Serving & Storage
Serving Ideas
- Pair the cookie with vanilla ice cream for a classic dessert.
- Enjoy with a glass of cold milk.
- Warm the cookie and top with a scoop of ice cream and a drizzle of chocolate sauce.
- Enjoy with a cup of coffee or tea.
Storage and Make-Ahead
- Store baked cookies in an airtight container at room temperature for up to 3 days.
- Freeze baked cookies for up to 2 months.
- Freeze cookie dough balls for up to 3 months. You can also prepare an apple pie overnight french toast breakfast bake. Bake directly from frozen, adding a few extra minutes to the baking time.
Conclusion
This recipe combines the magic of melted and browned butter to create thick chocolate chip cookies with unbeatable flavor and texture. With its easy-to-follow instructions and consistent results, you’ll be baking perfect cookies every time. Don’t be afraid to experiment with different mix-ins and serving ideas to make this recipe your own. Print this recipe and share it with your friends!
FAQ
What causes cookies to spread too thin, and how can I prevent it?
Cookies spread too thin due to warm butter, overmixing, or not chilling the dough. Make sure your butter is at room temperature (but not melted), avoid overmixing the dough, and always chill the dough for at least 30 minutes before baking.
What is the optimal baking temperature and time for thick chocolate chip cookies?
The ideal baking temperature is 375 degrees F (190 degrees C). Bake for 10-15 minutes, depending on the size of the cookies, until the edges are golden brown and the centers are still slightly soft.
How does chilling the dough affect the texture and spread of the cookies?
Chilling the dough helps to prevent excessive spreading by firming up the butter, which allows the cookies to maintain their shape during baking. It also enhances the flavor by allowing the ingredients to meld together. If you like make-ahead recipes, try this make ahead breakfast casserole recipe!
Why is it important to check the internal temperature of the cookies?
Checking the internal temperature ensures that the cookies are fully baked and safe to eat. The recommended internal temperature for cookies is 160 degrees F (71 degrees C).
Can I freeze the cookie dough, and how should I bake it?
Yes, you can freeze cookie dough balls for up to 3 months. Bake directly from frozen, adding a few extra minutes to the baking time.
How can I adjust the recipe for high-altitude baking?
In high-altitude environments, reduce the amount of baking powder by 1/4 teaspoon and increase the liquid (milk or water) by 1-2 tablespoons. You can learn more about high-altitude baking adjustments at King Arthur Baking.
“`
Best Thick Chocolate Chip Cookies Recipe (Easy)
Ingredients
Equipment
Method
- Line a large baking sheet with a silicone baking mat.
- In a large mixing bowl, add the softened salted butter, light brown sugar, and white sugar.
- Using a hand mixer or stand mixer fitted with the paddle attachment, cream the butter and sugars together until light and fluffy. This should take 3-5 minutes.
- Add the large eggs and vanilla extract to the creamed mixture. Mix until just combined.
- In the same mixing bowl, add the all-purpose flour, baking soda, baking powder, and salt. Mix until the dough is just coming together. It's okay if the dough seems a little crumbly at this point; that's normal. Be careful not to overmix, as this can lead to tough cookies.
- Gently stir in the semi sweet chocolate chips until they are evenly distributed throughout the dough.
- Divide the dough into 6 equal portions of 162-gram portions. Use a cookie scoop or a kitchen scale to ensure even sizing.
- Form each portion of dough into tall, rounded balls. The height of the dough balls contributes to the thickness of the final cookie. We don't want flat cookies!
- Place the formed dough balls on the prepared baking sheet and refrigerate for at least 30 minutes.
- Preheat your oven to 375 degrees F (190 degrees C). Make sure the oven rack is in the center position for even baking.
- Bake the cookies for 15 minutes. The cookies are done when the edges are golden brown, and the centers are still slightly soft.
- Check the internal temperature of the cookies using a food thermometer to ensure they have reached 160 degrees F (71 degrees C).
- Remove the cookies from the oven and let them cool on the baking sheet for at least 10 minutes before transferring them to a wire rack to cool completely.