Introduction
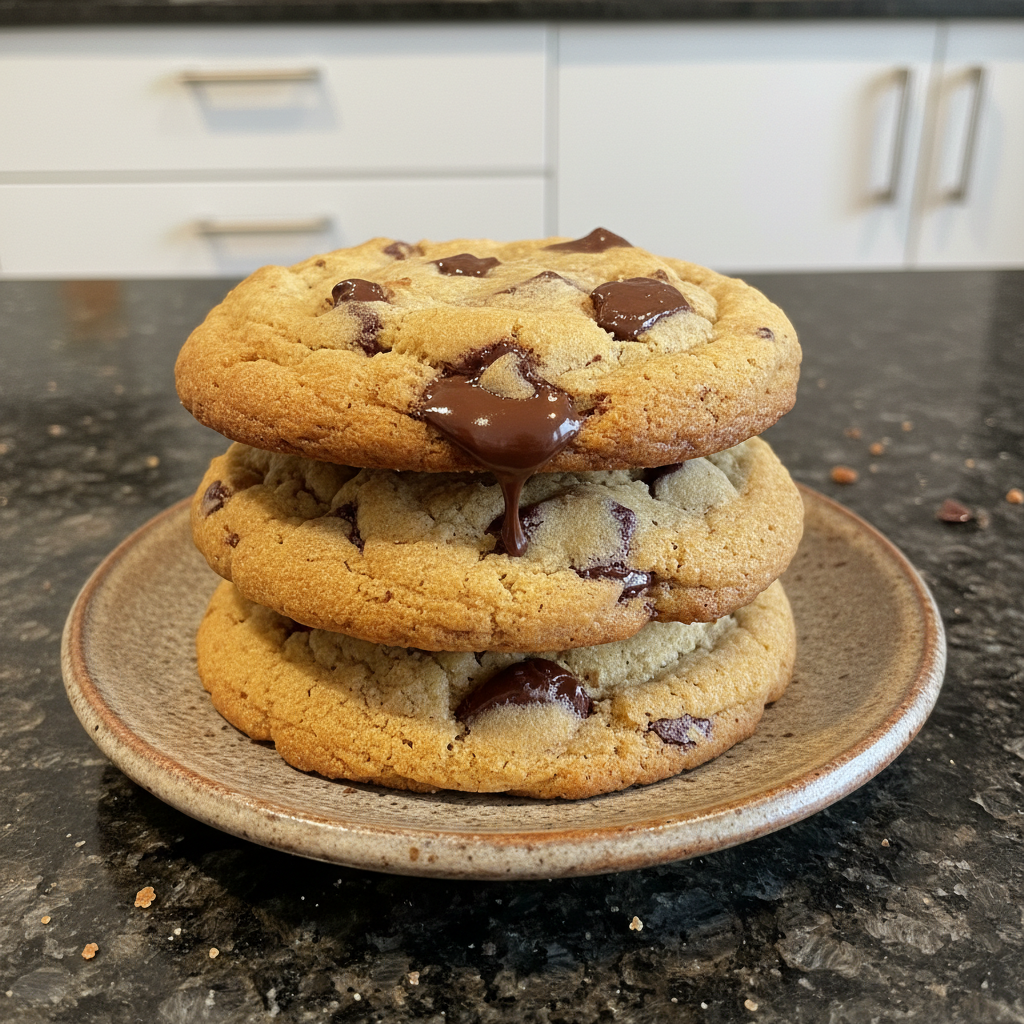
Imagine biting into a perfectly soft, chewy chocolate chip cookie with a hint of nutty caramel flavor. This soft chocolate chip cookie recipe is the answer to your cookie cravings, delivering bakery-quality results from your own kitchen. This recipe caters to a mixed intent, providing both a detailed recipe and informational tips for achieving the perfect soft cookie. You’ll learn how to make irresistibly soft chocolate chip cookies with a simple yet transformative technique: browning the butter.
For more information about the science behind browning, you can check out this article on the Maillard reaction.
Why You’ll Love This Recipe
This recipe stands out because of one simple trick: browned butter.
Unique Twist Focus: This recipe features browned butter, a simple technique that elevates the flavor of these cookies to a whole new level.
Browned Butter Explanation: Browning the butter imparts a nutty, toasty flavor that adds depth and complexity to the cookies. The Maillard reaction during browning creates delicious compounds that enhance the overall taste.
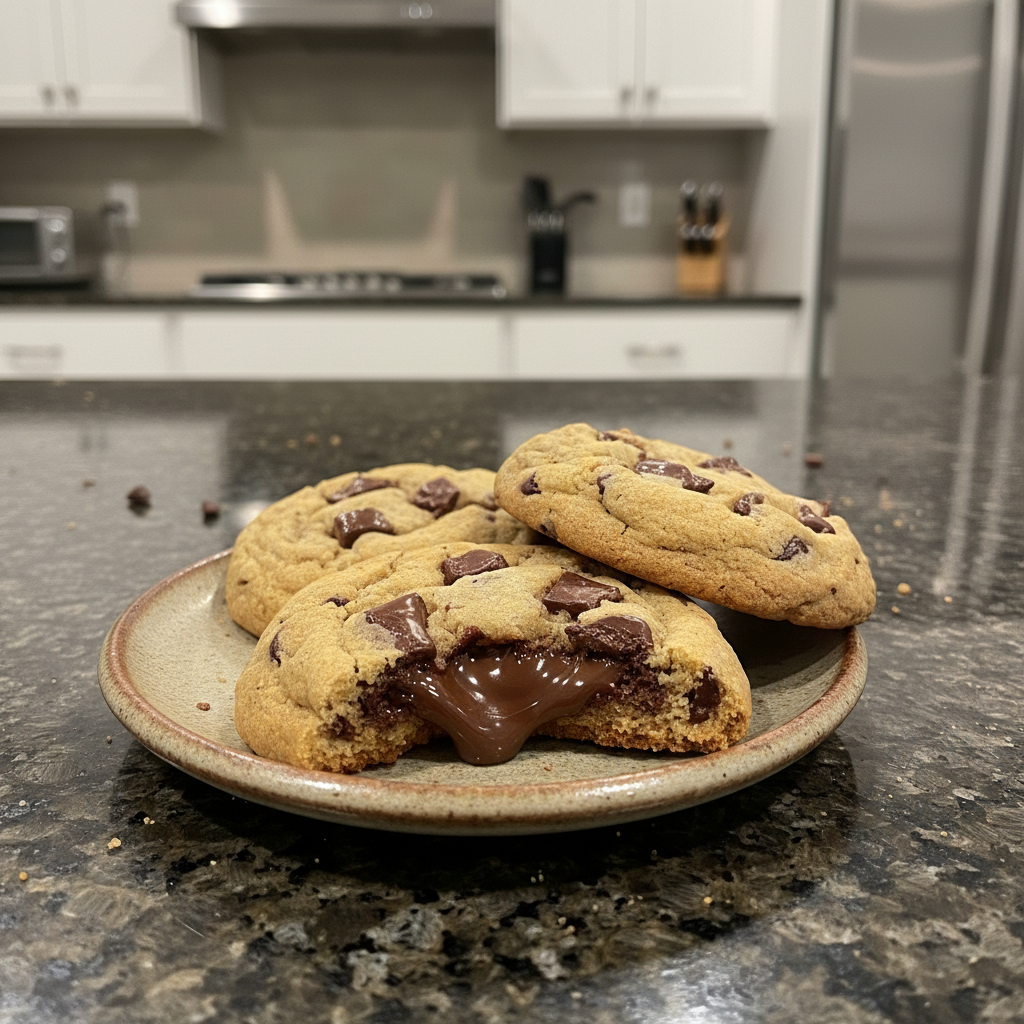
Taste: You’ll achieve an unforgettable flavor that will impress friends and family.
Texture: The cookies will be perfectly soft and chewy, not cakey or crispy.
Easy: The browned butter technique is surprisingly simple to master.
Ingredients Needed

* 8 tablespoons of salted butter
* 1/2 cup white sugar (I like to use raw cane sugar with a coarser texture)
* 1/4 cup packed light brown sugar
* 1 teaspoon vanilla
* 1 egg
* 1 1/2 cups all purpose flour (6.75 ounces)
* 1/2 teaspoon baking soda
* 1/4 teaspoon salt (but I always add a little extra)
* 3/4 cup chocolate chips (I use a combination of chocolate chips and chocolate chunks)
Ingredient Notes & Substitutions
Butter: I use salted butter in this recipe because I like the slight saltiness it adds, which complements the sweetness. If you only have unsalted butter, you can use it! Just add an extra 1/4 teaspoon of salt to the recipe. For a dairy-free option, I’ve had success with brands like Miyoko’s Kitchen Cultured Vegan Butter.
Sugar: White sugar contributes to the cookies’ crisp edges and overall sweetness. Brown sugar adds moisture and chewiness due to its molasses content. I enjoy using raw cane sugar for its coarser texture and slightly less refined flavor.
Flour: For a gluten-free version, I recommend using a 1:1 gluten-free flour blend like Bob’s Red Mill Gluten Free 1-to-1 Baking Flour. When measuring flour, spoon it into your measuring cup and level it off with a knife to avoid adding too much.
Chocolate: I love using a combination of semi-sweet chocolate chips and dark chocolate chunks for a complex chocolate flavor. Milk chocolate chips will result in a sweeter cookie, while dark chocolate will provide a richer, more intense chocolate experience.
How to Make Soft Chocolate Chip Cookie Recipe
Browning the butter is the key to this soft chocolate chip cookie recipe! Follow these steps for cookie perfection:
Step 1: Brown the Butter
Preheat the oven to 350 degrees. Melt the butter in a saucepan over medium heat. Continue cooking until it turns a nutty brown color and has a distinct nutty aroma (about 5-7 minutes). Watch carefully to prevent burning; you’ll see the milk solids turn brown at the bottom of the pan. Remove from heat and let cool slightly (about 5-10 minutes). You don’t want it to be hot, just warm.
Step 2: Cream the Sugars and Butter
Using a stand mixer or electric beaters, beat the browned butter with the white and brown sugars until creamy and well combined. This usually takes about 2-3 minutes.
Step 3: Add Vanilla and Egg
Add the vanilla and the egg; beat on low speed until just incorporated (10-15 seconds). Avoid overmixing at this stage, as it can lead to tougher cookies.
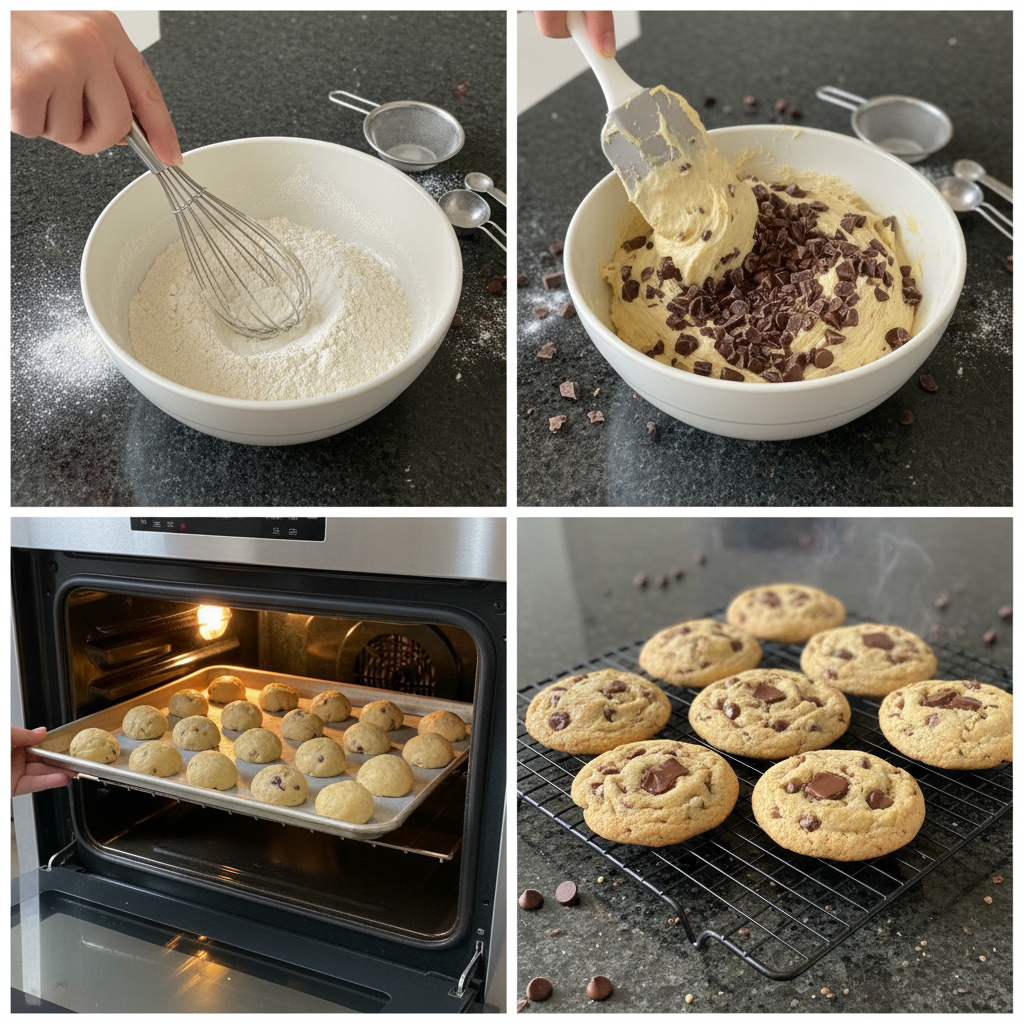
Step 4: Incorporate Dry Ingredients
Add the flour, baking soda, and salt. Mix until crumbles form. Use your hands to press the crumbles together into a dough.
Step 5: Add Chocolate Chips
Add the chocolate chips and incorporate with your hands. I find this is the easiest way to evenly distribute the chocolate without overmixing the dough.
Step 6: Shape and Bake
Roll the dough into 12 large balls (or 9 for larger cookies) and place on a cookie sheet lined with parchment paper. Slightly flatten the balls. Bake for 9-11 minutes until the cookies look puffy and dry and just barely golden around the edges. The edges should be set, and the centers should still look slightly soft and underbaked. They will continue to bake as they cool on the pan.
Step 7: Cool and Enjoy
Let them cool on the pan for 30 minutes before transferring to a wire rack to cool completely. This is crucial for achieving the right texture. The cookies will continue to set up as they cool, resulting in a perfectly soft and chewy texture.
Why Melted (and Browned) Butter Makes for Soft Cookies
Melted butter, especially browned butter, is a game-changer for cookie texture. The fat content in melted butter creates a more tender cookie by preventing gluten development. When butter is browned, the Maillard reaction occurs, creating complex flavors and also altering the fats in a way that contributes to a chewier texture. Make sure not to overheat the butter to the point of burning, as this will negatively impact the flavor. Allowing the browned butter to cool slightly before mixing ensures that it doesn’t melt the sugars and create a greasy dough.
To better understand the role of fats in baking, you may find this resource from the USDA helpful.
Troubleshooting: Common Cookie Problems
Even with the best recipes, things can sometimes go wrong. Here’s how to troubleshoot common cookie problems:
Cookies Flattening Too Much: This can be due to too much butter, not enough flour, or warm dough. Try chilling the dough for 30 minutes before baking. If that doesn’t help, add a tablespoon or two of flour to the dough.
Cookies Being Too Puffy: This is often caused by too much baking soda or overmixing the dough. Make sure you’re measuring the baking soda accurately and avoid overmixing once you add the dry ingredients.
Cookies Too Greasy: This usually happens if the butter was too hot when added to the sugars or if there’s too much butter in the recipe. Cool the browned butter longer before creaming with the sugars. You can also try reducing the butter quantity slightly in future batches.
Cookies Too Dry: This is typically due to too much flour or overbaking. Ensure you’re measuring the flour correctly (spoon and level method) and don’t overbake the cookies. Remove them from the oven when the edges are set and the centers are still slightly soft.
Pro Tips & Troubleshooting
Here are some extra tips to ensure your cookies turn out perfectly every time:
Pro Tips
Rolling the dough into balls and slightly flattening them before baking can help control the spread and thickness of the cookies.
A pinch of instant coffee powder can be added to enhance the bitterness in the chocolate.
Sprinkling a pinch of sea salt on top immediately after baking enhances the sweetness and provides a contrasting flavor.
Use a cookie scoop for uniform cookies.
Chilling the dough for 30 minutes before baking will result in a thicker cookie.
Ensure your oven is properly preheated for even baking.
Common Mistakes to Avoid
Cookies flatten too much if not enough flour is added.
Overbaking results in hard cookies. Monitor closely and remove when edges are set and centers are still slightly soft.
Scooping flour directly from the bag can lead to too much flour, resulting in puffy cookies. Spoon and level instead.
Using butter that is too hot can cause the cookies to spread too much.
Serving & Storage
Here’s how to best serve and store your soft chocolate chip cookies:
Serving Ideas
Serve warm with a glass of milk.
Pair with vanilla ice cream for a simple dessert.
Serve with peanut butter for a gooey treat.
Offer alongside a cup of coffee or tea.
Create an ice cream sandwich with two cookies and your favorite ice cream flavor.
Storage and Make-Ahead
Storage: Store cooled cookies in an airtight container at room temperature for up to 5 days.
Freezing Dough: Roll the dough into balls and freeze on a baking sheet. Once frozen, transfer to a freezer bag. Bake from frozen, adding 1-2 minutes to the baking time.
Freezing Baked Cookies: Freeze baked cookies in an airtight container for up to 2 months. Thaw at room temperature before serving.
Conclusion
These soft chocolate chip cookies are easy to make, incredibly delicious, and feature a unique browned butter twist for enhanced flavor. Even if you’re a beginner baker, you can achieve perfect results with this recipe. Try different types of chocolate chips or add nuts for a personalized touch. If you’re looking for other delicious treats, you might enjoy these strawberry shortcake cookies. Print this recipe and share it with your friends and family!
FAQ
Why did my cookies flatten?
Too much butter, not enough flour, or warm dough can cause cookies to flatten. Try chilling the dough or adding a bit more flour.
Why are my cookies so puffy?
Too much baking soda or overmixing can lead to puffy cookies. Measure your ingredients carefully and avoid overmixing the dough.
Can I freeze chocolate chip cookie dough?
Yes! Roll the dough into balls and freeze on a baking sheet. Once frozen, transfer to a freezer bag. Bake from frozen, adding 1-2 minutes to the baking time.
Can I make these gluten-free?
Yes, you can substitute the all-purpose flour with a gluten-free flour blend. Be sure to use a blend that is designed for baking.
How should I store the cookies after baking?
Store cooled cookies in an airtight container at room temperature for up to 5 days.
What is the ideal internal temperature of the cookie when baked?
The ideal internal temperature is around 200-210°F. However, it’s best to rely on visual cues: the edges should be set and the center should be slightly soft. For another great dessert idea, consider making these easy Oreo Easter egg treats.
Best Soft Chocolate Chip Cookie Recipe (Easy!)
Ingredients
Equipment
Method
- Preheat the oven to 350 degrees.
- Melt the butter in a saucepan over medium heat.
- Continue cooking until it turns a nutty brown color and has a distinct nutty aroma (about 5-7 minutes). Watch carefully to prevent burning; you’ll see the milk solids turn brown at the bottom of the pan.
- Remove from heat and let cool slightly (about 5-10 minutes). You don't want it to be hot, just warm.
- Using a stand mixer or electric beaters, beat the browned butter with the white and brown sugars until creamy and well combined. This usually takes about 2-3 minutes.
- Add the vanilla and the egg; beat on low speed until just incorporated (10-15 seconds). Avoid overmixing at this stage, as it can lead to tougher cookies.
- Add the flour, baking soda, and salt. Mix until crumbles form.
- Use your hands to press the crumbles together into a dough.
- Add the chocolate chips and incorporate with your hands. I find this is the easiest way to evenly distribute the chocolate without overmixing the dough.
- Roll the dough into 12 large balls (or 9 for larger cookies) and place on a cookie sheet lined with parchment paper.
- Slightly flatten the balls.
- Bake for 9-11 minutes until the cookies look puffy and dry and just barely golden around the edges. The edges should be set, and the centers should still look slightly soft and underbaked.
- They will continue to bake as they cool on the pan.
- Let them cool on the pan for 30 minutes before transferring to a wire rack to cool completely. This is crucial for achieving the right texture.
- The cookies will continue to set up as they cool, resulting in a perfectly soft and chewy texture.