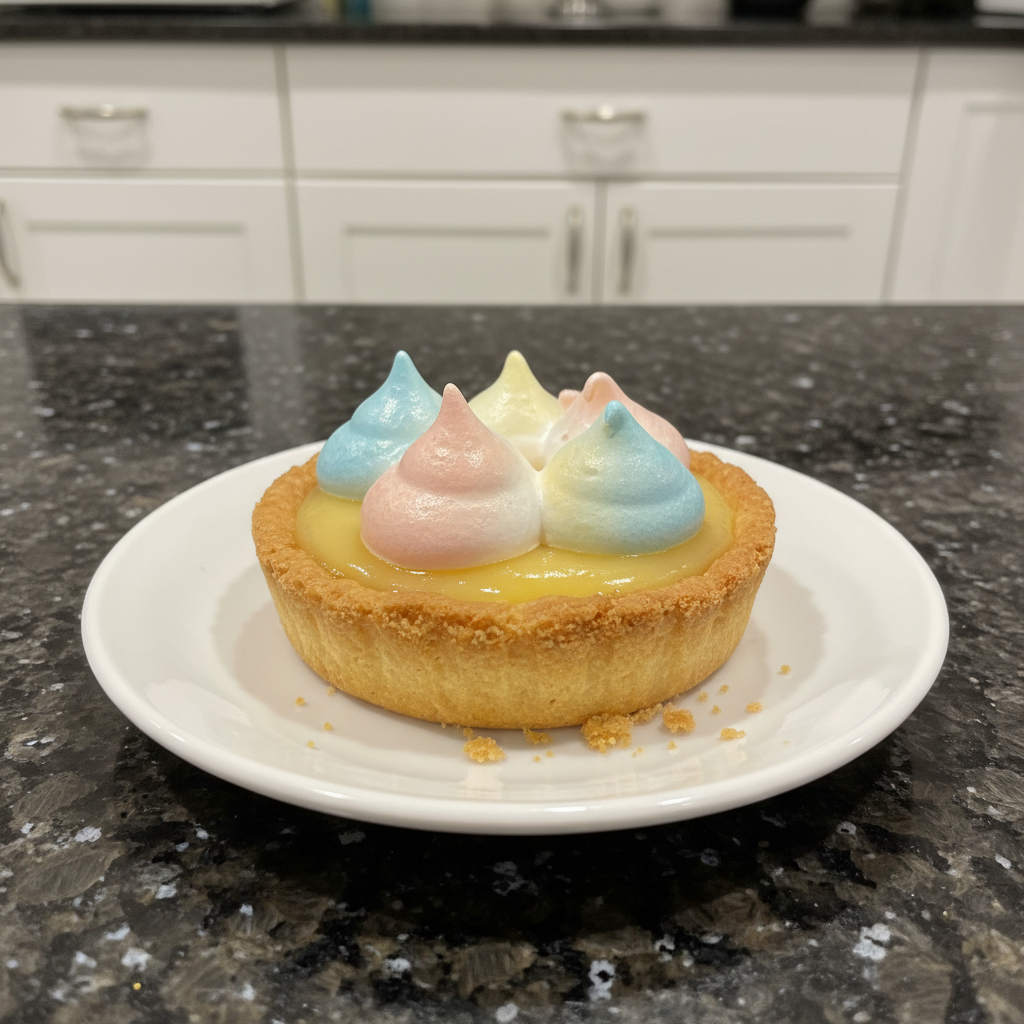
Imagine biting into a delicate, flower-shaped tart, the buttery crust giving way to a luscious, tangy lemon filling. These mini lemon flower tarts are not only incredibly delicious but also a charming addition to any Easter celebration. This recipe teaches you how to make these delightful treats, with a special surprise ingredient that elevates them to a whole new level. Get ready to bake some springtime magic with these mini lemon flower tarts easter recipe!
Why You’ll Love This Recipe
These aren’t just any lemon tarts; they have a secret weapon that makes them irresistible.
Unique White Chocolate Layer: These mini tarts feature a thin layer of finely grated white chocolate baked into the crust. This adds a subtle sweetness and creamy texture that balances the tart lemon perfectly.
Prevents Soggy Crust: The white chocolate acts as a moisture barrier, preventing the lemon filling from making the crust soggy. This ensures every bite is delightfully crisp.
Perfect for Easter: These mini lemon flower tarts are perfect for Easter. Their floral shape and bright flavor evoke the spirit of spring. They’re also elegant enough to impress guests and surprisingly easy to make.
Ingredients Needed

Homemade All Butter Pie Crust or 2 pre-made (ready to roll pie crusts)
4 egg yolks + 1 egg for egg wash
1/3 cup cornstarch
1 1/2 cups water
1 1/3 cups sugar
1/4 teaspoon salt
3 tablespoons butter
1/2 cup lemon juice
1 tablespoon finely grated lemon zest
1 tablespoon powdered sugar
Ingredient Notes & Substitutions
Pie Crust: I love making my own all-butter pie crust for the flakiest results, but store-bought crusts work great in a pinch. For a truly exceptional crust, ensure your butter is cold and avoid overmixing. If you’re gluten-free, use a gluten-free pie crust recipe or a pre-made gluten-free crust.
Cornstarch: Cornstarch is essential for thickening the lemon filling. If you don’t have cornstarch, tapioca starch can be used as a substitute. Use the same amount of tapioca starch as cornstarch.
Lemon Juice & Zest: Fresh lemon juice and zest are key to the vibrant lemon flavor in these tarts. The zest, with its essential oils, provides a fragrant boost that complements the tartness of the lemon juice. Don’t skimp on either! You can learn more about the benefits of lemon zest.
Butter: I recommend using unsalted butter so you can control the amount of salt in the filling.
Sugar: Sugar balances the tartness of the lemon juice, creating a harmonious flavor profile. I prefer granulated sugar in this recipe, but you can experiment with other sweeteners like honey or agave, adjusting the amount to taste. You can also read about artificial sweeteners from the Mayo Clinic.

How to Make Mini Lemon Flower Tarts Easter
Here’s how to make these delightful mini lemon flower tarts, step by step.
Prepare the Crust
Step 1: Preheat oven to 350 degrees.
Step 2: Grease and flour (or use nonstick cooking spray) a mini-muffin pan. Set aside.
Step 3: Unroll pie crusts on a silicon mat and cut out as many flowers as possible. My flower shaped cookie cutter is 4-inches in diameter petal tip to petal tip. Once your first set of flowers are cut, you can ball up the dough and roll it out again.
Step 4: You should be able to get 24 flower shaped dough pieces.
Step 5: Put the dough pieces in mini muffin tins, leaving an empty space between crusts. Press them into the bottom and on the sides. Prick the bottoms with a fork.
Step 6: Brush egg wash from one egg to the top edges of each crust. This will help them achieve a beautiful golden-brown color.
Step 7: Bake for 15-20 minutes or until golden around the edges. The edges should be a rich golden-brown color, indicating they are perfectly baked.
Step 8: Remove from oven and let the crust cool while you make the filling. Once cooled, use the tip of a knife to loosen the crusts from the mini muffin cups. The crust should easily release with a gentle nudge.
Add the White Chocolate Layer
While the crusts are still warm (but not too hot!), finely grate white chocolate into the bottom of each tart shell, creating a thin, even layer. About 1/2 teaspoon per tart is usually perfect. The warmth of the crust will help the chocolate melt slightly and adhere to the pastry.
Make the Lemon Filling
Step 9: Whisk egg yolks in medium size mixing bowl and set aside.
Step 10: In a medium saucepan, combine cornstarch, water, sugar and salt. Stir constantly over medium low heat until mixture comes to a boil. Boil for 1 minute. Remove from the heat and reduce the heat to low. The mixture will thicken and become translucent.
Step 11: Pour half of this mixture into the egg yolk mixture in a thin stream, whisking constantly. This is called tempering the egg yolks, and it prevents them from scrambling when added to the hot mixture. It’s a crucial step for a smooth filling!
Step 12: Pour the “hot” egg mixture back into the saucepan, whisking constantly. Return to the stove and cook for an additional 3 minutes stirring constantly. The filling will thicken further to a pudding-like consistency.
Step 13: Remove from heat and stir in lemon juice and lemon zest. Finally whisk in your butter one tbsp at a time. The filling should be smooth and glossy at this stage.
Assemble and Serve
Step 14: Spoon mixture into each baked and cooled mini tart crust almost up to the top. Leave a small space to avoid overflow.
Step 15: When ready to serve, dust the powdered sugar over the tops. The lemon filling in the center is moist – so after a few minutes, the powdered sugar dissolves into the lemon filling and you will see it, only on petals. Dust right before serving for the best visual effect.
Troubleshooting and Make-Ahead Instructions
Here are some tips to avoid common tart-making pitfalls, as well as instructions on how to prepare these tarts in advance.
Troubleshooting Common Tart Problems
Preventing shrinking crust: To prevent the pie crust from shrinking, chill the dough thoroughly before rolling it out. You can also blind bake the crust using pie weights to help it maintain its shape. Docking the crust with a fork also helps.
Addressing cracked filling: Avoid overbaking the tarts, and make sure your oven heats evenly. Overbaking can cause the filling to crack.
Make-Ahead Instructions
Making the crust ahead: You can make the pie crust dough ahead of time and store it in the refrigerator for up to 2 days or in the freezer for up to 2 months. Baked crusts can be stored in an airtight container at room temperature for up to 2 days.
Making the lemon filling ahead: The lemon filling can be made a day or two in advance. Store it in an airtight container in the refrigerator. Before using, gently rewarm it over low heat, stirring constantly, until smooth.
Pro Tips & Troubleshooting
Pro Tips
Use high-quality ingredients for the best flavor.
Chill the pie crust dough before rolling it out to prevent shrinking.
Finely grate the white chocolate for an even layer and subtle flavor.
Temper the egg yolks carefully to avoid scrambling.
Use a silicon mat for easy rolling and removal of the flower shapes.
Brush the tart edges with egg wash for a golden-brown finish.
Dust powdered sugar just before serving to prevent it from dissolving.
Ensure the tart shells are completely cooled before filling.
Common Mistakes to Avoid
Overmixing the pie crust dough, which can lead to a tough crust.
Not chilling the pie crust dough sufficiently.
Overbaking the crust, which can make it dry and brittle.
Scorching the lemon filling by using too high heat.
Adding the lemon juice and zest while the filling is still too hot, which can affect the flavor.
Using old or stale lemon juice or zest.
Skipping the white chocolate layer.
Serving & Storage
Serving Ideas
Serve the mini lemon flower tarts with a dollop of whipped cream or a scoop of vanilla ice cream.
Garnish with fresh berries or a sprig of mint.
Arrange the tarts on a decorative platter for an elegant presentation.
Pair with a glass of sparkling wine or a cup of herbal tea.
Consider serving with other Easter desserts. Need another idea? Why not try these irresistible strawberries and cream tiramisu!
Storage and Make-Ahead
Store the unfilled baked tart shells in an airtight container at room temperature for up to 2 days.
Store the lemon filling in an airtight container in the refrigerator for up to 3 days.
Store the finished tarts in the refrigerator for up to 2 days. Note that the crust may soften over time.
For longer storage, consider freezing the baked tart shells or the lemon filling separately. Thaw completely before assembling.
Conclusion
These mini lemon flower tarts are the perfect Easter treat, combining a bright, lemony filling with a delicate white chocolate layer in a beautiful, floral presentation. Even beginner bakers can succeed with this recipe. Feel free to experiment with different variations, such as adding a different type of chocolate or using a different citrus fruit. If you are feeling adventurous, you could even try using some fermented fruit for your zest like in this fermented onions recipe. Print this recipe and share it with your friends and family!
FAQ
How can I prevent the pie crust from shrinking?
Answer: Chilling the dough, using pie weights during blind baking, and docking the crust with a fork can all help prevent shrinking.
How long can I store the lemon filling and finished tarts?
Answer: The lemon filling can be stored in the refrigerator for up to 3 days. Finished tarts are best enjoyed within 2 days.
What are some common problems and solutions when making lemon tarts?
Answer: Common problems include shrinking crusts, cracked filling, and a soggy bottom. The troubleshooting section above addresses these issues in detail.
What gives the best lemon flavor? Juice or zest?
Answer: Both lemon juice and zest are important for the best flavor. The zest provides essential oils and fragrance, while the juice contributes tartness.
Can the recipe be adapted for different size tart tins?
Answer: Yes, you can adapt this recipe for different size tart tins. Adjust the baking time accordingly.
Can I make a gluten-free version?
Answer: Yes, use a gluten-free pie crust recipe or a store-bought gluten-free crust. Ensure the other ingredients are also gluten-free. For another gluten-free dessert, check out this matcha tiramisu recipe.
How do I get the powdered sugar to stay white on the petals?
Answer: The secret is to dust them right before serving. Otherwise, the moisture will dissolve them quickly.
“`

Mini Lemon Flower Tarts: Perfect Easter Dessert!
Ingredients
Equipment
Method
- Preheat oven to 350 degrees.
- Grease and flour (or use nonstick cooking spray) a mini-muffin pan. Set aside.
- Unroll pie crusts on a silicon mat and cut out as many flowers as possible using a 4-inch flower-shaped cookie cutter. Once your first set of flowers are cut, you can ball up the dough and roll it out again.
- You should be able to get 24 flower shaped dough pieces.
- Put the dough pieces in mini muffin tins, leaving an empty space between crusts. Press them into the bottom and on the sides. Prick the bottoms with a fork.
- Brush egg wash from one egg to the top edges of each crust. This will help them achieve a beautiful golden-brown color.
- Bake for 15-20 minutes or until golden around the edges. The edges should be a rich golden-brown color, indicating they are perfectly baked.
- Remove from oven and let the crust cool while you make the filling. Once cooled, use the tip of a knife to loosen the crusts from the mini muffin cups. The crust should easily release with a gentle nudge.
- While the crusts are still warm (but not too hot!), finely grate white chocolate into the bottom of each tart shell, creating a thin, even layer. About 1/2 teaspoon per tart is usually perfect. The warmth of the crust will help the chocolate melt slightly and adhere to the pastry.
- Whisk egg yolks in medium size mixing bowl and set aside.
- In a medium saucepan, combine cornstarch, water, sugar and salt. Stir constantly over medium low heat until mixture comes to a boil. Boil for 1 minute. Remove from the heat and reduce the heat to low. The mixture will thicken and become translucent.
- Pour half of this mixture into the egg yolk mixture in a thin stream, whisking constantly. This is called tempering the egg yolks, and it prevents them from scrambling when added to the hot mixture. It’s a crucial step for a smooth filling!
- Pour the "hot" egg mixture back into the saucepan, whisking constantly. Return to the stove and cook for an additional 3 minutes stirring constantly. The filling will thicken further to a pudding-like consistency.
- Remove from heat and stir in lemon juice and lemon zest. Finally whisk in your butter one tbsp at a time. The filling should be smooth and glossy at this stage.
- Spoon mixture into each baked and cooled mini tart crust almost up to the top. Leave a small space to avoid overflow.
- When ready to serve, dust the powdered sugar over the tops. The lemon filling in the center is moist – so after a few minutes, the powdered sugar dissolves into the lemon filling and you will see it, only on petals. Dust right before serving for the best visual effect.
Notes
Lia Monet is a food blogger, recipe developer, and the founder of EasyAsMeals, a food blog focused on easy recipes, quick dinners, and everyday home cooking. She creates tested, family-friendly recipes using simple ingredients to help busy families cook affordable and delicious meals at home.