Every year as cold and flu season approaches, I find myself reaching for my trusty jar of homemade elderberry syrup. It’s a staple in my kitchen, a natural remedy I swear by. This Elderberry Syrup Recipe is not only incredibly easy to make, but it also tastes delicious and provides a powerful immune boost. You’re about to learn how to create your own batch of potent elderberry syrup, complete with a special twist for even better flavor and health benefits. Get ready to feel empowered to support your well-being naturally!
Why You’ll Love This Best Elderberry Syrup Recipe
This isn’t just another elderberry syrup recipe; it’s a recipe with a purpose and a delicious upgrade.
Unique Twist: This recipe incorporates a cold maceration period, allowing the elderberries to release more of their beneficial compounds and deepen the flavor profile before cooking. This process enhances the syrup’s potency and richness.
Reasoning Behind the Twist: Cold maceration allows enzymes to break down cell walls, releasing more anthocyanins and other beneficial compounds that are typically lost during high-heat cooking.
Immune Boosting: Elderberries are renowned for their ability to strengthen the immune system, helping you fight off colds and flu.
Easy to Make: Even if you’re new to herbal remedies, this recipe is simple and straightforward.
Natural Remedy: Say goodbye to artificial ingredients; this syrup is a natural and wholesome way to support your health.
Family-Friendly: This syrup is generally safe for the whole family (but remember to avoid honey for infants under one year old!).
Ingredients Needed

- 1 cup dried elderberries
- 4 cups water
- 1 cup honey (or maple syrup)
Ingredient Notes & Substitutions
Elderberries: You can use fresh, dried, or frozen elderberries. I prefer dried elderberries for their concentrated flavor. If using fresh elderberries, ensure they are fully ripe and cooked to eliminate toxins. Source elderberries from reputable suppliers, such as local farms or online retailers specializing in herbs.
Sweetener Options: I typically use raw honey for its added antibacterial properties. However, maple syrup is a great vegan alternative. Remember that honey isn’t suitable for infants under one year old. You can learn more about the properties of honey and its uses from reputable sources like the Mayo Clinic.
Spice Variations: Feel free to add optional spices like cinnamon sticks, cloves, or ginger for extra flavor and immune-boosting benefits. Be mindful of any spice allergies within your family.
Water Quality: If you’re concerned about tap water quality, consider using filtered water for the purest flavor.

How to Make Elderberry Syrup
Step 1: Macerate the Elderberries
Combine the dried elderberries and water in a pot. I use a 6-quart pot to ensure there’s enough room for the mixture to simmer without overflowing. Gently stir the mixture, noticing the earthy aroma of the dried berries as they begin to rehydrate. Cover the pot and let it sit in the refrigerator for 24-48 hours. This cold maceration will pull out more of the beneficial compounds.
Step 2: Simmer the Mixture
After maceration, bring the elderberry mixture to a simmer over medium heat. Reduce the heat to low, ensuring it’s a gentle simmer rather than a rolling boil. You should see small bubbles forming and releasing steam. Allow the mixture to simmer for 45 minutes, or until the liquid has reduced by about half, and the aroma fills your kitchen.
Step 3: Strain the Syrup
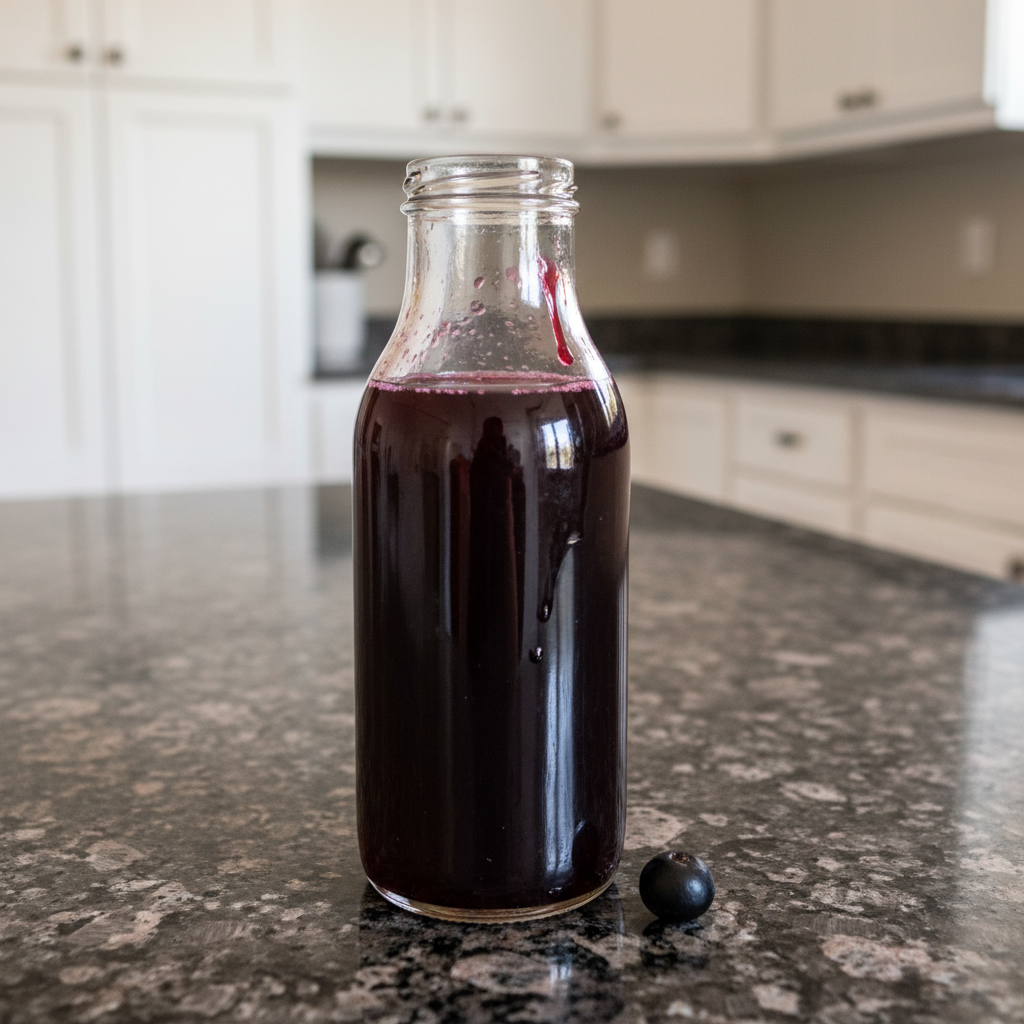
Remove the pot from the heat and let the mixture cool slightly. Place a fine-mesh sieve or cheesecloth-lined colander over a bowl. Carefully pour the elderberry mixture through the sieve, pressing down on the berries with a spoon to extract as much liquid as possible. The resulting syrup should be a deep, rich purple color and have a slightly thickened consistency.
Step 4: Add Sweetener
Once the strained liquid has cooled to warm (not hot to preserve the properties of the honey), stir in the honey (or maple syrup) until it is completely dissolved. The syrup will thicken slightly as it cools further. Taste and adjust sweetness as needed.
Step 5: Store the Syrup
Pour the finished elderberry syrup into sterilized glass jars or bottles. Store in the refrigerator for up to 2 months.
Elderberry Syrup Benefits: Beyond the Cold
Elderberry syrup is more than just a cold remedy; it’s a powerhouse of health benefits.
Antiviral Properties: Elderberries contain compounds that can inhibit viral replication, helping to shorten the duration and severity of viral infections. Studies have shown that elderberry extract can reduce the length of flu symptoms by several days. (Consult medical sources for citations on elderberry research)
Antioxidant Power: Elderberries are rich in antioxidants, which help protect your cells from damage caused by free radicals and reduce inflammation in the body. You can read more about the benefits of antioxidants from Harvard’s School of Public Health.
Immune System Support: Elderberry stimulates the immune system, encouraging it to produce more immune cells to fight off infections.
Vitamin and Mineral Content: Elderberries provide vitamins and minerals, including vitamin C, vitamin A, and potassium, further supporting overall health.
Mood Enhancement: Some studies suggest that the antioxidants in elderberries may have a positive impact on mood and cognitive function.
It’s important to note that elderberry syrup may interact with certain medications. Consult with your healthcare provider if you have any concerns.
Pro Tips & Troubleshooting
Pro Tips
- Use high-quality elderberries for the best flavor and potency.
- Adjust the sweetness to your preference, but remember honey acts as a preservative.
- Store the syrup in sterilized glass jars to prolong its shelf life.
- Add a splash of lemon juice to enhance flavor and preserve the syrup.
- Use filtered water to avoid impurities.
- Consider adding ginger for extra anti-inflammatory benefits.
- For a thicker syrup, simmer for a longer time.
- Maximize the cold maceration benefit by ensuring the elderberries are fully submerged in the water for the full duration.
Common Mistakes to Avoid
- Using unripe elderberries (they are toxic!).
- Overcooking the syrup, which can reduce its potency.
- Not storing the syrup properly, leading to spoilage.
- Not straining the syrup thoroughly, resulting in a gritty texture.
- Adding too much water, diluting the syrup’s concentration.
- Using tap water with undesirable minerals.
Serving & Storage
Serving Ideas
- Take it straight by the spoonful for immune support.
- Mix it into sparkling water or herbal tea for a refreshing drink.
- Drizzle it over pancakes, waffles, or yogurt.
- Use it as a natural sweetener in smoothies.
- Include as an ingredient in cocktails.
- Combine with a sore throat lozenge.
Storage and Make-Ahead
- Fridge: Store in an airtight container in the refrigerator for up to 2 months.
- Freezer: Freeze in ice cube trays for longer storage (up to 6 months). Thaw as needed.
- Make-Ahead: The syrup can be made ahead of time and stored in the refrigerator until needed.
Conclusion
Making your own elderberry syrup is incredibly rewarding. With its unique flavor profile enhanced by the cold maceration technique, its potent immune-boosting properties, and the sheer ease of preparation, this Elderberry Syrup Recipe is a winner. It’s truly beginner-friendly and provides a natural way to support your health during cold and flu season. Don’t hesitate to experiment with different spices and sweeteners to create your perfect batch. Share this recipe with your friends and family so they can also experience the goodness of homemade elderberry syrup!
If you’re looking for other ways to use fruit in your cooking, you might enjoy making some homemade dried orange slices.
FAQ
What are the benefits of elderberry syrup?
Elderberry syrup is known for its immune-boosting and antiviral properties, helping to reduce the severity and duration of colds and flu.
How much elderberry syrup should I take?
For adults, a typical dose is 1 tablespoon per day for prevention, and up to 4 times a day when sick. For children over one year old, 1 teaspoon per day for prevention, and up to 4 times a day when sick. Always consult with a pediatrician for specific dosage recommendations.
Can I use dried elderberries instead of fresh?
Yes, you can use dried elderberries. As a general rule, 1 cup of fresh elderberries is roughly equivalent to 1/2 cup of dried elderberries. Preparation is similar for both, but dried elderberries often have a more concentrated flavor.
How long does elderberry syrup last?
When stored properly in an airtight container in the refrigerator, homemade elderberry syrup can last for up to 2 months. For longer storage, you can freeze it in ice cube trays for up to 6 months.
Is elderberry syrup safe for children?
Elderberry syrup is generally safe for children over one year old. Avoid giving honey to infants under one year old due to the risk of botulism.
Can I take elderberry syrup if I’m pregnant or breastfeeding?
If you are pregnant or breastfeeding, it is always best to consult with your healthcare provider before taking elderberry syrup or any other herbal remedy.
Does elderberry syrup interact with any medications?
Elderberry may interact with certain medications, such as diuretics and immunosuppressants. It is essential to consult with a healthcare professional if you are taking any medications.
How to make elderberry syrup vegan?
To make elderberry syrup vegan, simply replace honey with a vegan alternative like maple syrup or agave nectar.
Best Elderberry Syrup Recipe: Boost Immunity Naturally
Ingredients
Method
- Combine the dried elderberries and water in a 6-quart pot. Gently stir the mixture until the dried berries rehydrate. Cover the pot and let it sit in the refrigerator for 24-48 hours.
- After maceration, bring the elderberry mixture to a simmer over medium heat. Reduce the heat to low and simmer gently for 45 minutes, or until the liquid has reduced by about half.
- Remove the pot from the heat and let the mixture cool slightly. Place a fine-mesh sieve or cheesecloth-lined colander over a bowl. Carefully pour the elderberry mixture through the sieve, pressing down on the berries with a spoon to extract as much liquid as possible.
- Once the strained liquid has cooled to warm, stir in the honey (or maple syrup) until it is completely dissolved. Taste and adjust sweetness as needed.
- Pour the finished elderberry syrup into sterilized glass jars or bottles. Store in the refrigerator for up to 2 months.
Notes
Lia Monet is a food blogger, recipe developer, and the founder of EasyAsMeals, a food blog focused on easy recipes, quick dinners, and everyday home cooking. She creates tested, family-friendly recipes using simple ingredients to help busy families cook affordable and delicious meals at home.