Craving delicate, delicious crepes but avoiding gluten? You’re in the right place! This recipe makes perfectly thin and tender gluten-free crepes that are surprisingly easy to make. The secret? A touch of psyllium husk! You might be wondering how it works. It’s the key to creating a flexible, tear-free crepe every time. Get ready to learn how to make these fantastic crepes and discover endless filling possibilities for breakfast, brunch, or dessert!
Why You’ll Love This Gluten-Free Crepes Recipe
These aren’t just any gluten-free crepes; they’re special, thanks to a simple but powerful addition.
Psyllium Power: The secret ingredient, psyllium husk, makes these crepes incredibly strong and less likely to tear. It acts like gluten, giving the batter more elasticity. For more information, you can read about the health benefits of psyllium on the Mayo Clinic website.
Subtly Nutty Flavor: Beyond its structural benefits, psyllium husk adds a delicate, nutty flavor that complements both sweet and savory fillings.
Easy to Make: Even if you’re new to gluten-free cooking, this recipe is straightforward and foolproof.
Family-Friendly: With endless filling options, these crepes are a guaranteed crowd-pleaser for breakfast, brunch, or a special dessert.
Light and Tender Texture: These crepes have a light and tender texture, almost identical to traditional crepes made with wheat flour.
Ingredients Needed
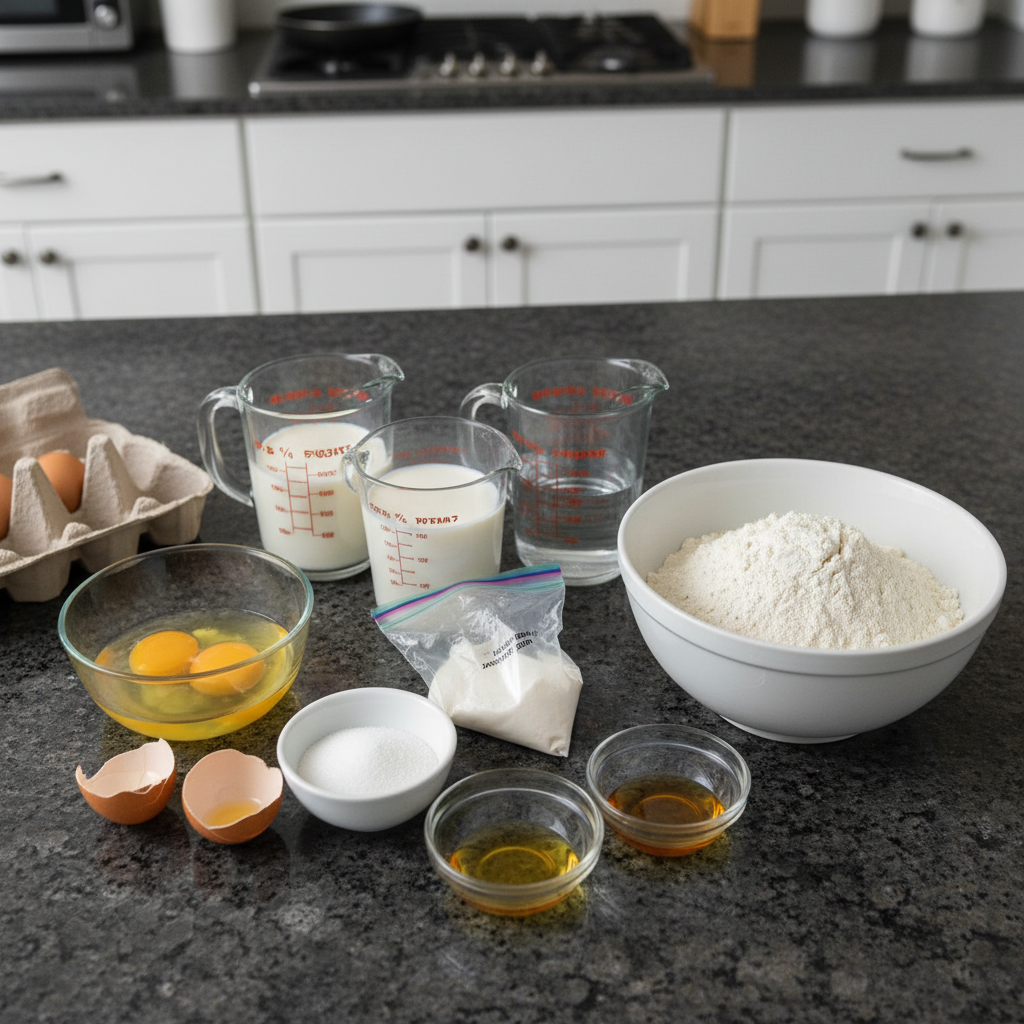
- 2 large eggs
- ¾ cup milk (for a dairy-free option, use plain unsweetened almond, cashew, or coconut milk)
- ½ cup water
- 1 cup gluten-free all-purpose flour with xanthan gum
- ¼ tsp xanthan gum (leave out if your flour already has it)
- 2 tbsp granulated sugar (omit for savory crepes*)
- 1 tsp pure vanilla extract (omit for savory crepes)
- 3 tbsp unsalted butter (melted, for a dairy-free option, use Smart Balance butter)
Ingredient Notes & Substitutions
Let’s talk about some key ingredients and how to adapt them to your needs.
Gluten-Free Flour: For best results, use a high-quality gluten-free all-purpose flour blend that contains xanthan gum. Bob’s Red Mill 1-to-1 Gluten Free Baking Flour or King Arthur Measure for Measure Gluten-Free Flour are excellent choices. If your blend doesn’t have xanthan gum, add ¼ teaspoon.
Dairy-Free Options: For a dairy-free version, use unsweetened almond milk, cashew milk, or coconut milk. For the butter, Smart Balance is a great dairy-free alternative.
Savory Crepes: Planning to make savory crepes? Simply omit the sugar and vanilla extract. That’s what the asterisk* is for above.
How to Make Gluten-Free Crepes recipe
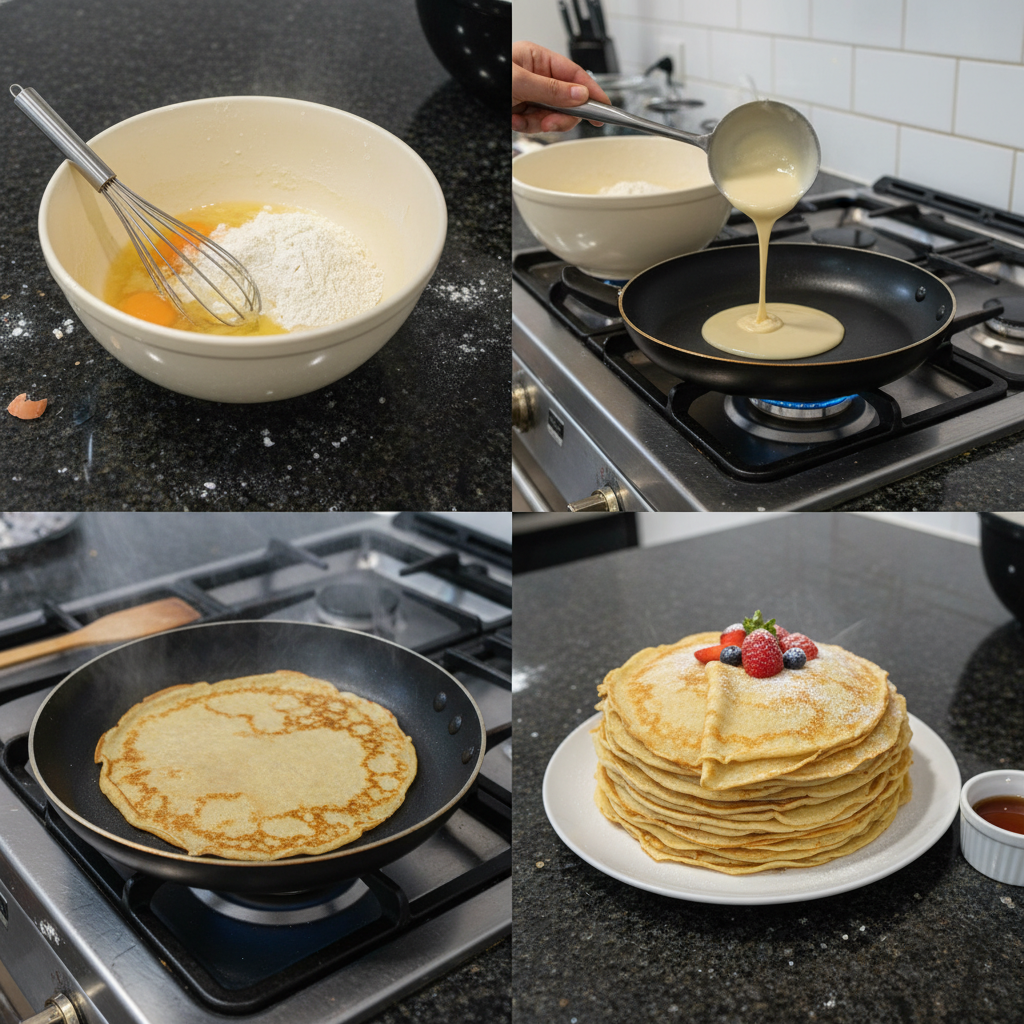
Step 1: Whisk the Eggs
In a large bowl, whisk the eggs until they are light and frothy. This helps create a smooth base for your batter.
Step 2: Combine Ingredients
Add the milk, water, gluten-free all-purpose flour, xanthan gum (if needed), sugar (if using), vanilla extract (if using), and melted butter to the bowl. Mix on medium speed for about 1 minute, until the batter is smooth. It’s important to have a smooth batter to avoid lumps in your crepes!
Step 3: Preheat the Pan
Lightly spray a non-stick pan or crepe pan with cooking spray and preheat it over medium heat. Make sure the pan is hot before adding the batter; otherwise, the crepes can turn out rubbery.
Step 4: Pour and Swirl
Pour ¼ cup of batter into the center of the hot pan. Immediately lift the pan and swirl it to spread the batter thinly and evenly across the surface.
Step 5: Cook the Crepe
Cook for 30-45 seconds on the first side, until the edges look dry and golden brown. The crepe should easily release from the pan when ready to flip. Flip carefully with a thin spatula and cook for another 30 seconds on the other side, until golden brown.
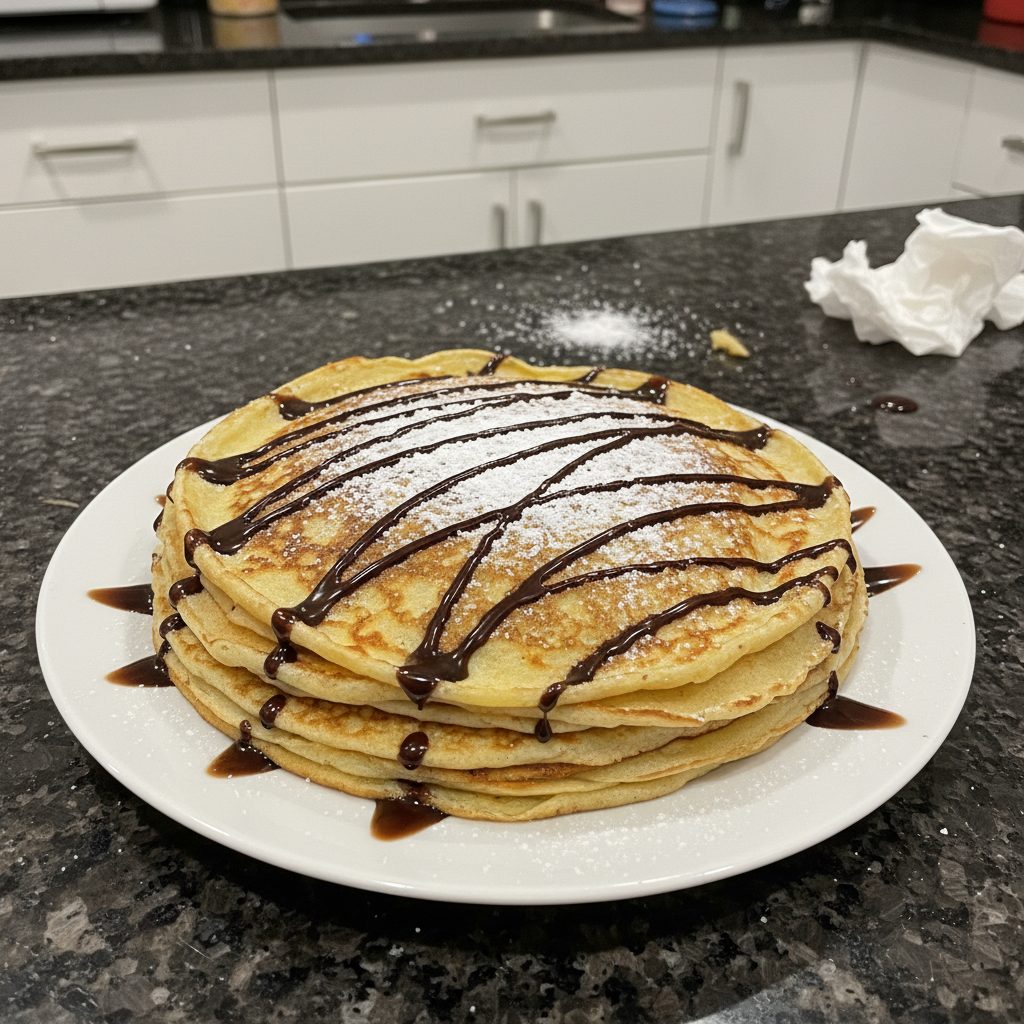
Step 6: Serve and Enjoy
Slide the crepe onto a plate. Serve immediately, rolled or folded into triangles, with your favorite sweet or savory fillings and toppings. Enjoy the fruits, or crepes, of your labor!
Gluten-Free Flour Guide
Choosing the right gluten-free flour is crucial for crepe success. Different blends yield different textures.
Rice Flour: Adds crispiness.
Tapioca Starch: Contributes chewiness.
Sorghum Flour: Provides a neutral flavor and soft texture.
Potato Starch: Helps create a light and airy crepe.
For beginners, I recommend using a pre-made blend like Bob’s Red Mill 1-to-1 or King Arthur Measure for Measure. These blends are designed to mimic the properties of wheat flour and are very forgiving.
Xanthan gum acts as a binder, replacing the gluten that would normally hold the crepe together. Without it, your crepes might be crumbly.
Testing different flours involves making small batches of crepes with each type and noting the texture and taste. This allows you to determine which blend works best for your preferences and the fillings you plan to use. For more information on Gluten-Free Crepe Batter, check out the topic clusters.
Pro Tips & Troubleshooting
Pro Tips
- Let the batter rest for at least 30 minutes (or up to 2 hours) to allow the psyllium husk to fully hydrate. This is crucial for texture.
- Use a crepe pan or a non-stick skillet for the best results. A crepe pan’s shallow edge makes it easier to flip the crepes.
- Use a thin spatula for easy flipping.
- Adjust the amount of batter depending on the size of your pan. You want a thin, even layer.
- If the batter is too thick, add a tablespoon of milk at a time until you reach the desired consistency.
- Keep cooked crepes warm in a low oven until ready to serve.
Common Mistakes to Avoid
- Starting with a cold pan causes rubbery crepes. Ensure the pan is fully preheated.
- Overmixing the batter can develop gluten (even in gluten-free flour blends) and make the crepes tough.
- Using too much batter creates thick crepes. Use just enough to thinly coat the pan.
- Flipping the crepe too early causes it to tear. Wait until the edges are set and golden brown.
- Not greasing the pan enough causes sticking. Use a light coating of cooking spray or butter.
Serving & Storage
Serving Ideas
The possibilities are endless when it comes to fillings! Here are a few ideas to get you started.
Sweet: Dust with powdered sugar, spread with Nutella, fill with fruit compotes, whipped cream and strawberries, or peanut butter and bananas. Chocolate sauce is also a great addition!
Savory: Fill with scrambled eggs and bacon, cheese and vegetables, smoked salmon and cream cheese, or ham and cheese. Try a drizzle of Hollandaise sauce, too! The vegan cream cheese and chives is especially delicious.
Pair your crepes with coffee, tea, juice, or even mimosas for a delightful brunch experience. Sweet Crepe Fillings and Savory Crepe Fillings ideas await in the topic clusters.
Speaking of delicious brunch ideas, have you tried a Blueberry Spinach Smoothie? It’s a great way to start your day!
Storage and Make-Ahead
Want to make these ahead of time? Here’s how.
Fridge: Store cooked crepes in an airtight container in the refrigerator for up to 3 days. Layer with parchment paper to prevent sticking.
Freezer: Freeze cooked crepes individually on a baking sheet, then transfer to a freezer bag. Freeze for up to 2 months. Thaw in the refrigerator or microwave.
Reheating: Reheat crepes in a skillet, microwave, or oven until warmed through. See content gaps for more details
Conclusion
These easy gluten-free crepes are a guaranteed success, thanks to the psyllium husk trick! They’re tear-free, delicious, and incredibly versatile. Even if you’re new to gluten-free baking, this recipe is foolproof. So, what are you waiting for? Try this recipe today and let me know what you think in the comments! Experiment with different fillings and serving ideas to create your own signature crepe.
If you are looking for something else to make be sure to checkout my other recipes like my Easy Orange Cake!
FAQ
Here are some frequently asked questions to help you perfect your gluten-free crepes.
What is the best gluten-free flour blend to use for crepes, and why?
The best gluten-free flour blend typically contains a mix of rice flour, tapioca starch, and potato starch. A pre-made 1-to-1 blend is a great option for beginners. These blends offer a good balance of texture and binding power for delicate crepes. Find out more about gluten-free baking from King Arthur Baking.
How can I prevent my gluten-free crepes from tearing or sticking to the pan?
The psyllium husk in this recipe helps prevent tearing. Also, make sure to let the batter rest, and grease the pan properly before cooking each crepe.
What are some tasty sweet and savory filling ideas for gluten-free crepes?
For sweet crepes, try Nutella, whipped cream and berries, or fruit compotes. For savory crepes, consider scrambled eggs and bacon, cheese and vegetables, or smoked salmon and cream cheese.
How do I store and reheat gluten-free crepes to maintain their texture?
Store cooked crepes in the refrigerator with parchment paper between them to prevent sticking. You can also freeze them individually and reheat in a skillet or microwave.
Can I make this recipe dairy-free, and what substitutions should I use?
Yes! Use almond milk, cashew milk, or coconut milk in place of regular milk, and use a dairy-free butter alternative like Smart Balance instead of butter.
What does it mean to have a crepe dentelle?
A crepe dentelle is a very thin, crispy crepe. You can achieve this by using a very thin batter and cooking the crepe until the edges are lacy and crisp.
Can I use a blender to make the batter?
Yes, you can! Using a blender ensures a smooth batter without lumps. Simply blend all the ingredients together until smooth. Be careful not to over-blend, as this can develop the starches in the flour and make the crepes tough.
Easy Gluten-Free Crepes Recipe (Psyllium Boost!)
Ingredients
Equipment
Method
- In a large bowl, whisk the eggs until they are light and frothy.
- Add the milk, water, gluten-free all-purpose flour, xanthan gum (if needed), sugar (if using), vanilla extract (if using), and melted butter to the bowl. Mix on medium speed for about 1 minute, until the batter is smooth.
- Lightly spray a non-stick pan or crepe pan with cooking spray and preheat it over medium heat.
- Pour ¼ cup of batter into the center of the hot pan. Immediately lift the pan and swirl it to spread the batter thinly and evenly across the surface.
- Cook for 30-45 seconds on the first side, until the edges look dry and golden brown. Flip carefully with a thin spatula and cook for another 30 seconds on the other side, until golden brown.
- Slide the crepe onto a plate. Serve immediately, rolled or folded into triangles, with your favorite sweet or savory fillings and toppings.
Notes
Lia Monet is a food blogger, recipe developer, and the founder of EasyAsMeals, a food blog focused on easy recipes, quick dinners, and everyday home cooking. She creates tested, family-friendly recipes using simple ingredients to help busy families cook affordable and delicious meals at home.