Craving a satisfying and flavorful meal that’s ready in minutes? Look no further! These Cheesy Garlic Chicken Wraps are the answer. Packed with savory chicken, gooey cheese, and a delightful garlic punch, they’re perfect for a quick lunch, a fuss-free dinner, or even a tasty snack. Best of all, this recipe includes a special ingredient that will elevate your wrap game to the next level.
Why You’ll Love This Recipe
This isn’t just another chicken wrap recipe. I’ve added a few simple twists that make all the difference.
Unique Flavor Boost: The secret is in the seasoned cream cheese and roasted garlic. By using roasted garlic, you get a mellow, sweet flavor that’s not overpowering, and the cream cheese is seasoned with cayenne pepper and smoked paprika to balance the sweetness.
No More Soggy Wraps: A thin layer of seasoned cream cheese on the tortilla acts as a barrier, preventing the filling from making the tortilla soggy. This ensures every bite is as delicious as the first.
Quick & Easy: This recipe is incredibly fast and simple to make, making it perfect for busy weeknights or when you need a satisfying meal in a hurry.
Family-Friendly: The delicious flavors of these wraps are sure to please even the pickiest eaters. They are true comfort food.
Perfect for Meal Prep: Make the chicken filling ahead of time and assemble the wraps when you’re ready to eat. They’re also great cold for meal-prepping lunches.
Ingredients Needed
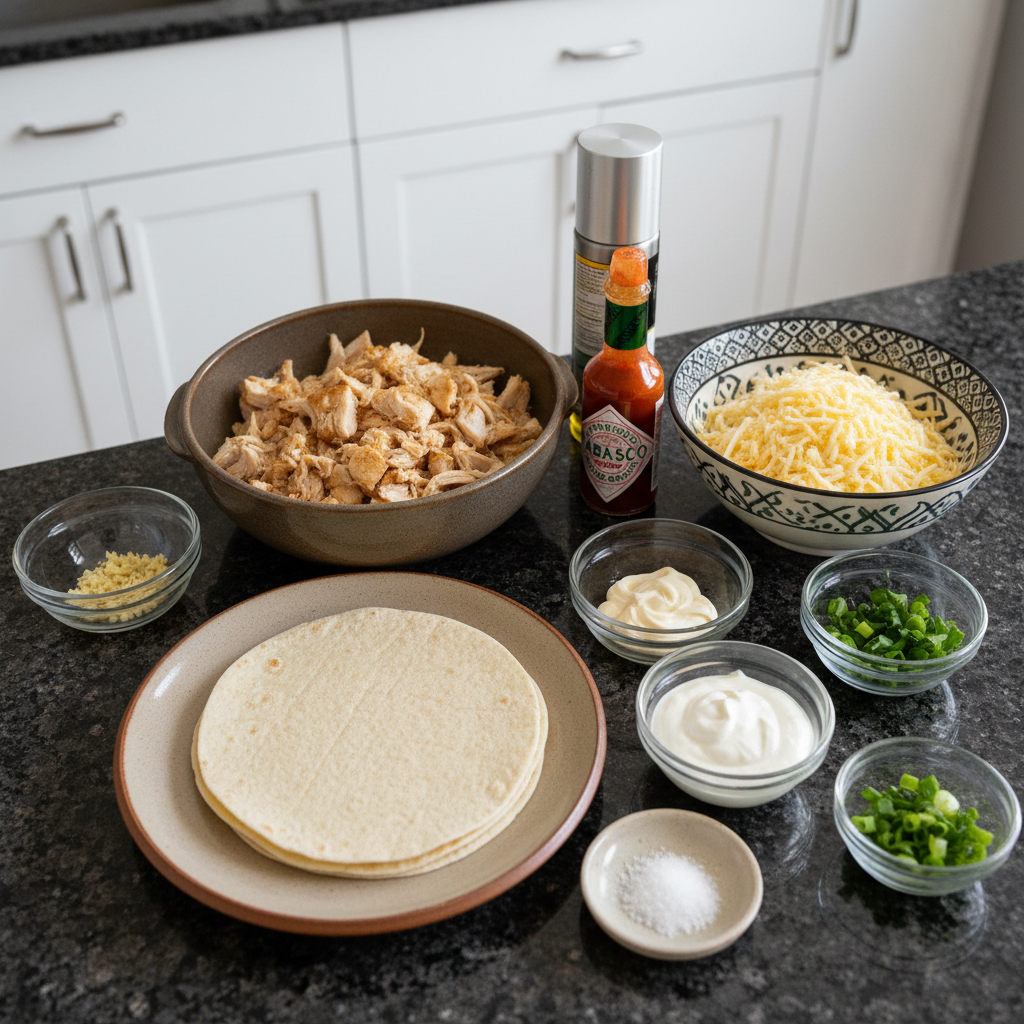
- 2 large tortillas (regular or low-carb/high-protein)
- 7 oz cooked chicken (about 200 grams, chopped (rotisserie is great))
- 2 garlic cloves (minced or grated (adjust to taste))
- 2 tablespoons light mayonnaise
- 1 tablespoon light Greek yogurt (or plain yogurt)
- 2 teaspoons hot sauce (like Frank’s)
- ¼ teaspoon salt
- 3 oz grated cheese (about 90 grams (I used a cheddar blend))
- 1 green onion (chopped)
- Olive oil spray
Ingredient Notes & Substitutions
Tortillas: I prefer flour tortillas for their soft texture, but whole wheat tortillas add a nice nutty flavor and more fiber. Corn tortillas can be used if you prefer, just make sure they are warmed slightly to prevent cracking. Low-carb and high-protein tortillas are great alternatives if you’re watching your macros.
Chicken: Rotisserie chicken is a fantastic shortcut for this recipe. You can also use grilled chicken breast or shredded chicken thighs. Ensure the chicken is cooked through and seasoned to your liking.
Cheese: Cheddar, Monterey Jack, mozzarella, or a cheddar blend all work well in these wraps. For a vegan option, use your favorite vegan cheese that melts well.
Mayonnaise/Yogurt: I use light mayonnaise and Greek yogurt to keep the wraps lighter, but feel free to use full-fat versions for a richer flavor. You can also use dairy-free yogurt for a dairy-free alternative.
Hot Sauce: I love Frank’s hot sauce, but you can use any hot sauce you prefer. Sriracha or chili flakes are also great options for adding some heat. Adjust the amount to your spice preference.
Garlic: Roasted garlic is key to the unique flavor of these wraps. You can buy pre-roasted garlic or roast your own. To roast garlic, cut off the top of a whole head of garlic, drizzle with olive oil, wrap in foil, and bake at 400°F (200°C) for 45-60 minutes, or until soft and caramelized. For more information on roasting garlic, you can visit this Allrecipes guide to roasting garlic.
How to Make Cheesy Garlic Chicken Wraps
Step 1: Chicken Filling
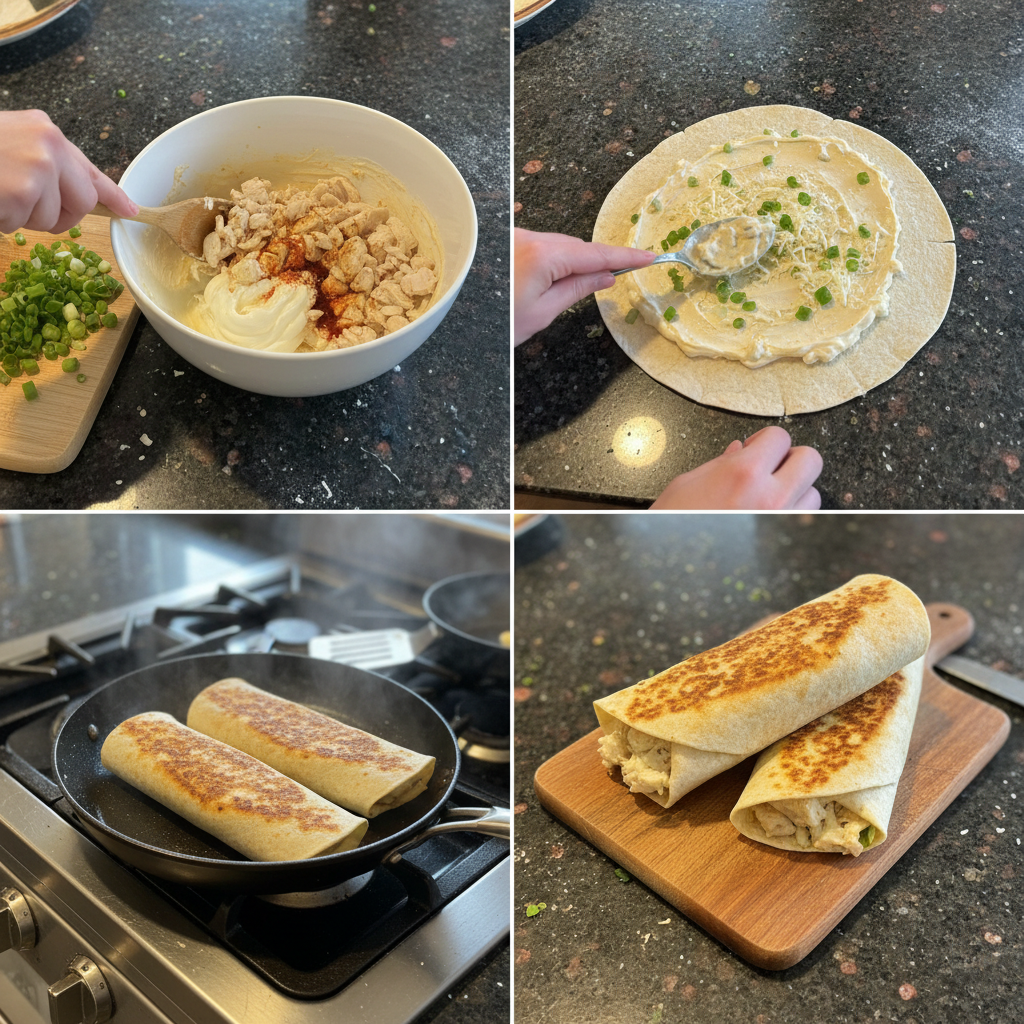
In a bowl, mix the chopped chicken, minced or grated garlic, mayonnaise, Greek yogurt, hot sauce, and salt. As you mix, the aroma of garlic will mingle with the other ingredients, creating a tantalizing scent. Mix until everything is well combined and the filling has a creamy texture.
Step 2: Assembling the Wraps
Lay out your tortilla on a flat surface. On the lower third of the tortilla, sprinkle about 2 tablespoons of grated cheese. Top with about ⅔ cup of the chicken mixture. Add another tablespoon of cheese and a sprinkle of chopped green onion. Layering the ingredients like this ensures every bite is cheesy and flavorful.
Be careful not to overfill the wrap, as this can make it difficult to roll and cause it to tear.
Step 3: Folding
Fold in the sides of the tortilla towards the center. This prevents the filling from spilling out while cooking. Then, roll the wrap up tightly from the bottom, tucking in the filling as you go.
Step 4: Cooking
Heat a non-stick pan over medium-high heat. Spray the pan lightly with olive oil. Place the wraps seam-side down in the hot pan. As the wrap hits the pan, you’ll hear a satisfying sizzle. Cook for 3–4 minutes per side, or until the wrap is crispy and golden brown. Covering the pan with a lid helps to heat the inside and melt the cheese evenly.
Step 5: Slicing and Serving
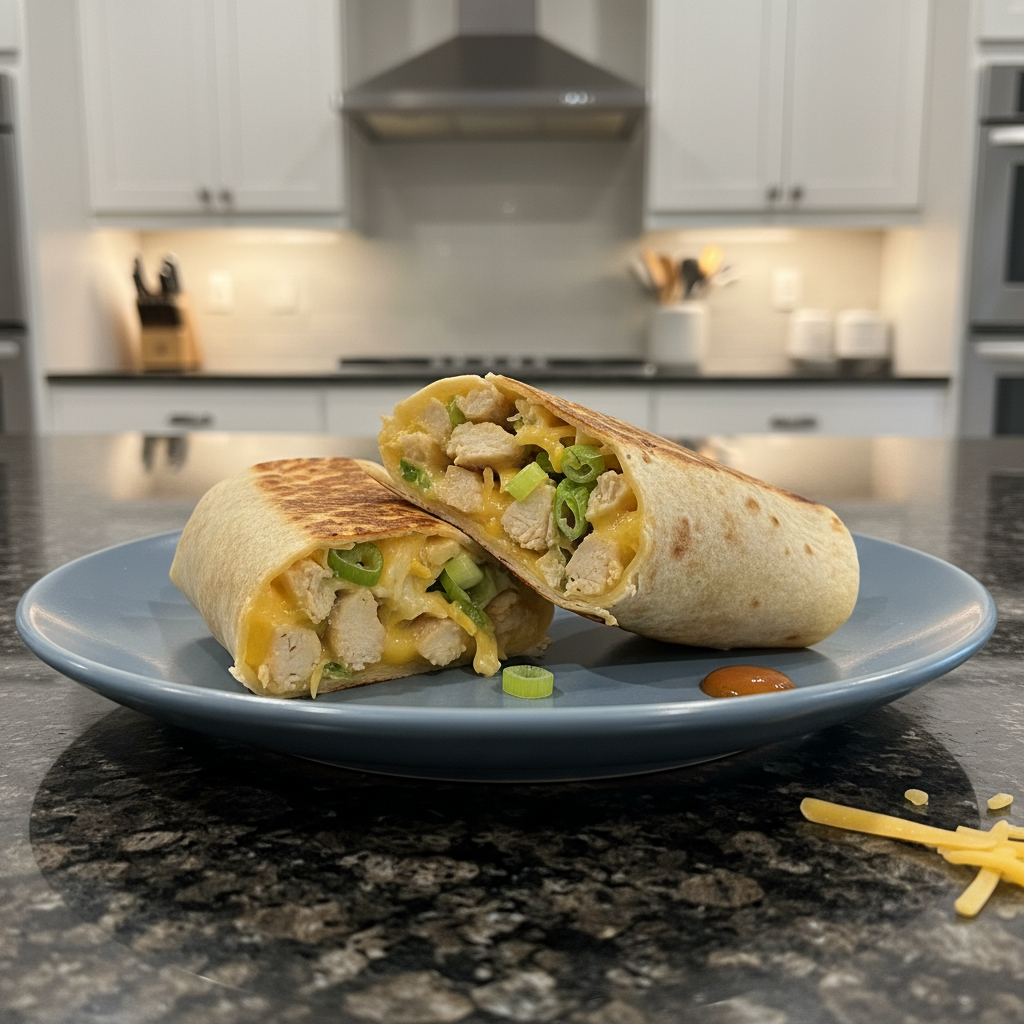
Carefully remove the cooked wrap from the pan and place it on a cutting board. Slice it in half with a sharp knife. You’ll see the melted cheese oozing out, creating a tempting visual. Serve immediately and enjoy!
Air Fryer Cheesy Garlic Chicken Wraps
For a quicker and healthier cooking method, try air frying these wraps! The air fryer gives them an amazing crispiness.
Preheat your air fryer to 375°F (190°C). Place the assembled wraps in the air fryer basket, making sure they are not overcrowded. Cook for 8-10 minutes, flipping halfway through, until golden brown and crispy. Make sure to fold the ends in tightly to prevent the filling from spilling out during air frying.
Pro Tips & Troubleshooting
Pro Tips
- Covering the pan while cooking helps the cheese melt faster.
- Make the chicken filling ahead and keep it in the fridge for up to 3 days.
- Use roasted garlic for a sweeter, more mellow garlic flavor.
- Don’t overfill the wraps to prevent them from tearing.
- Use a non-stick pan for easy cooking and cleanup.
- Spray the pan with olive oil for even browning.
- Warm tortillas slightly before assembling to prevent cracking.
Common Mistakes to Avoid
- Using too much filling, which can cause the wraps to tear.
- Not heating the pan enough, resulting in soggy wraps.
- Overcooking the wraps, leading to a burnt exterior.
- Skipping the roasted garlic, missing the unique flavor.
- Not folding the sides of the tortilla properly, causing filling to spill out.
- Using cold filling, which can take longer to heat through.
Serving & Storage
Serving Ideas
These Cheesy Garlic Chicken Wraps are delicious on their own, but here are a few serving suggestions to make them a complete meal.
Side Dishes: Serve with a big, crunchy salad, roasted vegetables, or sweet potato fries.
Dips: Offer salsa, guacamole, or a creamy cilantro-lime sauce for dipping.
Garnishes: Sprinkle with fresh cilantro or add a dollop of sour cream.
Drinks: Pair with a low-carb beverage to keep the meal light.
Storage and Make-Ahead
Fridge: Store leftover wraps in the refrigerator for up to 3 days in an airtight container.
Freezer: To freeze cooked wraps, wrap them individually in plastic wrap, then place them in a freezer bag. Freeze for up to 2 months. For uncooked wraps, assemble them, wrap tightly in plastic wrap, and freeze. Thaw in the refrigerator overnight before cooking. This helps prevent freezer burn.
Reheating: Reheat the wraps in a skillet over medium heat or in an air fryer at 350°F (175°C) for a few minutes per side until heated through and crispy.
Conclusion
These Cheesy Garlic Chicken Wraps are not only incredibly easy to make but also bursting with flavor. The combination of roasted garlic and seasoned cream cheese takes these wraps to a whole new level. Even if you’re a beginner cook, you’ll find this recipe simple and satisfying.
Looking for another quick meal? Why not try this 30-minute turkey chili recipe!
If you’re interested in the nutritional benefits of chicken, the primary ingredient in these wraps, you might find this resource from the USDA on chicken and food safety insightful.
Try experimenting with different cheeses, vegetables, or proteins to customize the wraps to your liking. Don’t forget to share this recipe with your friends and family!
FAQ
What are the best cheeses to use for optimal melting and flavor?
Cheddar, Monterey Jack, and mozzarella are great choices. They melt well and offer a classic cheesy flavor. You can also experiment with pepper jack for a little spice or provolone for a milder taste.
What are the best tortillas for these wraps (considering taste and texture)?
Flour tortillas are the most common choice for their soft texture and mild flavor. Whole wheat tortillas offer a slightly nutty taste and more fiber. Low-carb tortillas are also a great option for those watching their carb intake.
How far in advance can I prepare these, and what’s the best way to store them?
You can prepare the chicken filling up to 3 days in advance and store it in the refrigerator. Assemble the wraps just before cooking for the best results. Cooked wraps can be stored in the fridge for up to 2 days.
How do I reheat the wraps to maintain crispiness?
The best way to reheat the wraps is in a skillet over medium heat or in an air fryer at 350°F (175°C) for a few minutes per side. This will help to keep them crispy.
What are some good low-carb options to serve with the wraps?
Serve with a side salad with a light vinaigrette, steamed vegetables, or a low-carb dip like guacamole or salsa.
Can I use different types of meat?
Yes, you can substitute the chicken with shredded pork, ground beef, or even tofu for a vegetarian option. Adjust the seasoning accordingly.
These wraps would be great with a simple soup, too. Check out this vegan tomato soup recipe.
Cheesy Garlic Chicken Wraps: Quick & Easy Recipe
Ingredients
Method
- In a bowl, mix the chopped chicken, minced or grated garlic, mayonnaise, Greek yogurt, hot sauce, and salt. As you mix, the aroma of garlic will mingle with the other ingredients, creating a tantalizing scent. Mix until everything is well combined and the filling has a creamy texture.
- Lay out your tortilla on a flat surface. On the lower third of the tortilla, sprinkle about 2 tablespoons of grated cheese. Top with about ⅔ cup of the chicken mixture. Add another tablespoon of cheese and a sprinkle of chopped green onion. Layering the ingredients like this ensures every bite is cheesy and flavorful.
- Be careful not to overfill the wrap, as this can make it difficult to roll and cause it to tear.
- Fold in the sides of the tortilla towards the center. This prevents the filling from spilling out while cooking. Then, roll the wrap up tightly from the bottom, tucking in the filling as you go.
- Heat a non-stick pan over medium-high heat. Spray the pan lightly with olive oil. Place the wraps seam-side down in the hot pan. As the wrap hits the pan, you'll hear a satisfying sizzle. Cook for 3–4 minutes per side, or until the wrap is crispy and golden brown. Covering the pan with a lid helps to heat the inside and melt the cheese evenly.
- Carefully remove the cooked wrap from the pan and place it on a cutting board. Slice it in half with a sharp knife. You'll see the melted cheese oozing out, creating a tempting visual. Serve immediately and enjoy!