Looking for a quick, easy, and utterly delicious Easter treat? These no-bake Banana Pudding Easter Truffles are just the ticket! Imagine creamy banana flavor intensified with a special ingredient, all wrapped in smooth white chocolate. These festive truffles are incredibly simple to make and perfect for impressing your family and friends. In this recipe, you’ll learn how to create perfect truffles every time, with a unique twist that elevates both the flavor and texture!
Why You’ll Love This Recipe
These aren’t your average truffles. I’ve added a special ingredient to make them extra special. Here’s why you’ll be making them again and again:
No-bake: Perfect for when you want a delicious dessert without turning on the oven. It’s the ultimate convenience!
Quick & Easy: Minimal prep time makes these ideal for busy schedules. You can whip them up in no time!
Kid-Friendly: A fun and tasty treat that kids will love to help make and eat. Get them involved in the decorating!
Make-Ahead: Perfect for prepping in advance for Easter gatherings. One less thing to worry about on the big day!
The secret to these amazing truffles is the banana pudding mix. This intensifies the banana flavor and improves the truffle’s texture, making them firmer and more stable. It’s a game-changer for the perfect Easter dessert.
Ingredients Needed
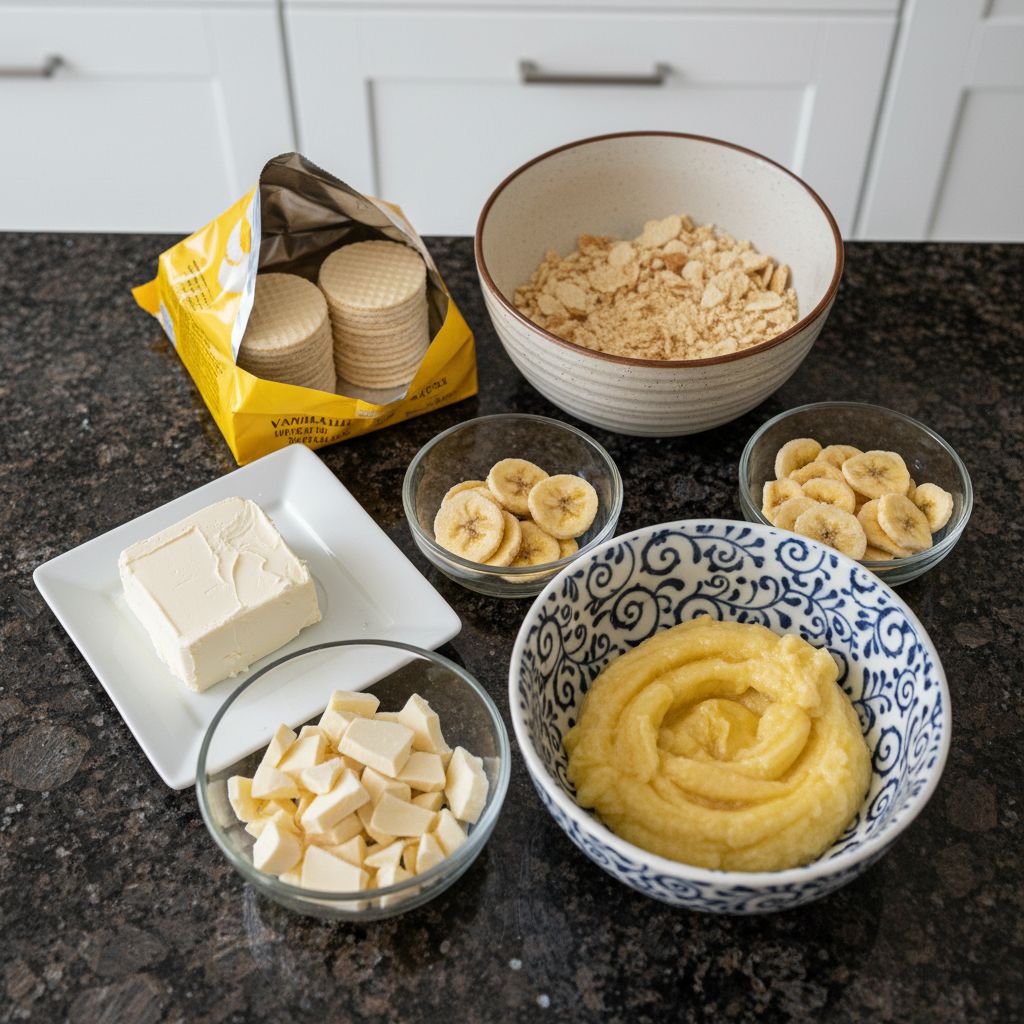
- 11 ounces vanilla wafers
- 8 ounces cream cheese (softened)
- 20 banana chips
- 2 mashed ripe bananas
- 8 ounces white chocolate
Ingredient Notes & Substitutions
Vanilla Wafers: Nilla Wafers are my go-to for their classic flavor and texture. For a twist, try Golden Oreos or animal crackers, but remember it will affect the final flavor.
Cream Cheese: Softened cream cheese is essential for a smooth batter. I recommend using full-fat cream cheese for the best texture. If you’re dairy-free, a dairy-free cream cheese alternative works well.
Banana Chips: Different brands and textures of banana chips will add slightly different crunch. Experiment to find your favorite! Some are softer, some are crispier.
Ripe Bananas: Use ripe but not overly ripe bananas for the best flavor and moisture. If you’re in a pinch, you can freeze and thaw bananas for a quick alternative. You can learn more about the best ways to store bananas to maintain their quality.
White Chocolate: A high-quality white chocolate that melts well is key to perfect chocolate dipping. Melting wafers or almond bark are budget-friendly alternatives. Adding food coloring is a great way to make these festive for Easter. You could also use dark chocolate for a richer flavor.
How to Make Banana Pudding Easter Truffles
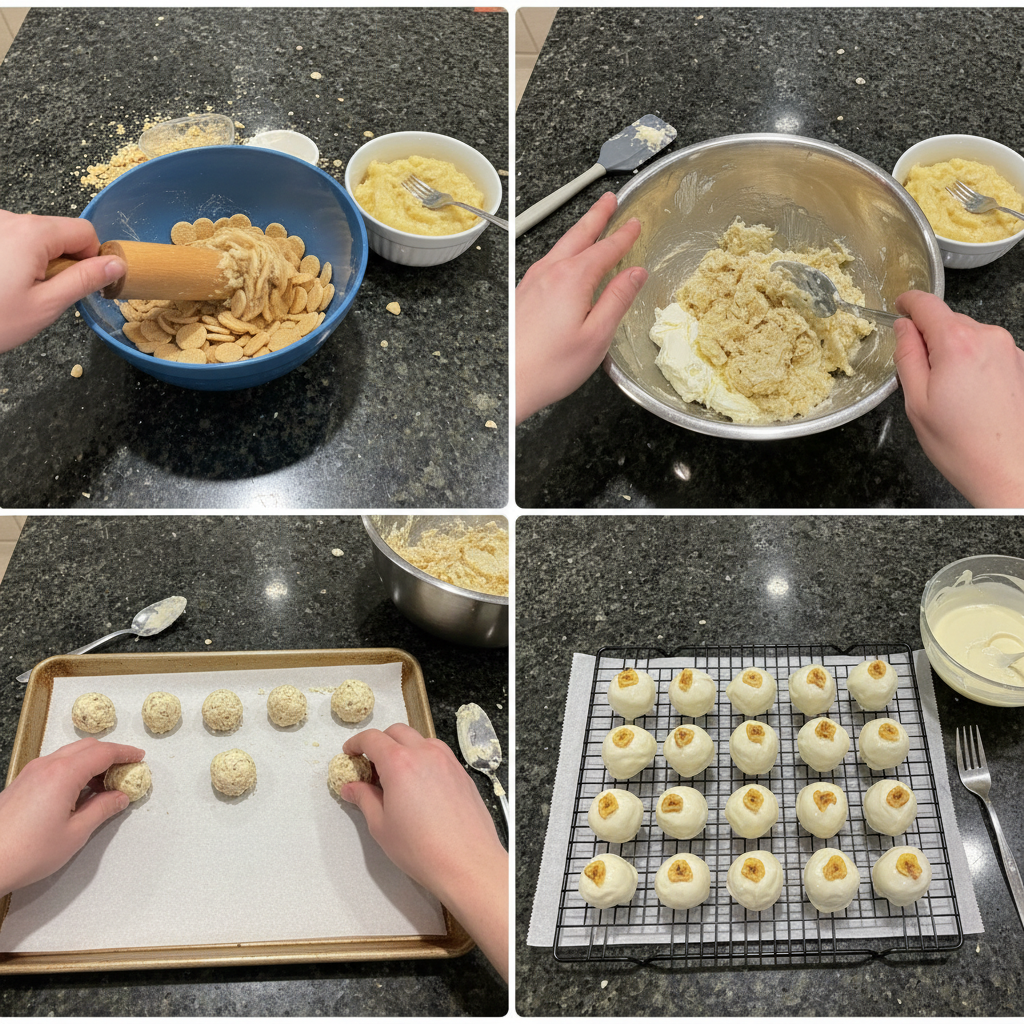
Step 1: Crush the Vanilla Wafers
Place vanilla wafers in a food processor and pulse until crumbs. You want them to be finely ground. If you don’t have a food processor, place them in a ziplock bag and crush them with a rolling pin.
Step 2: Combine Ingredients
Add the cream cheese and bananas to the crushed wafers. Make sure your cream cheese is softened, or the mixture will be lumpy.
Step 3: Form the Batter
Pulse until a stiff batter is formed. The ideal batter consistency should be firm enough to hold its shape. If it’s too wet, chill it in the freezer for a bit.
Step 4: Shape the Truffles
Scoop out into small balls, approximately 1.5 inches in diameter. Using a cookie scoop ensures uniform size and makes the process easier.
Step 5: Chill the Truffles
Freeze for 15 minutes. Chilling is important because it firms them up for dipping, preventing them from melting in the chocolate.
Step 6: Melt the Chocolate
While the balls are freezing, melt your chocolate in a double boiler on the stove top. This method gently melts the chocolate without burning it. Alternatively, you can use the microwave, but be careful to heat in short intervals and stir frequently.
Step 7: Dip the Truffles
Once balls are frozen, dip them in chocolate and place on parchment paper. Work quickly to prevent the chocolate from seizing.
Step 8: Decorate
Add a banana chip on the top. You can also use Easter sprinkles or crushed nuts for alternative decorations.
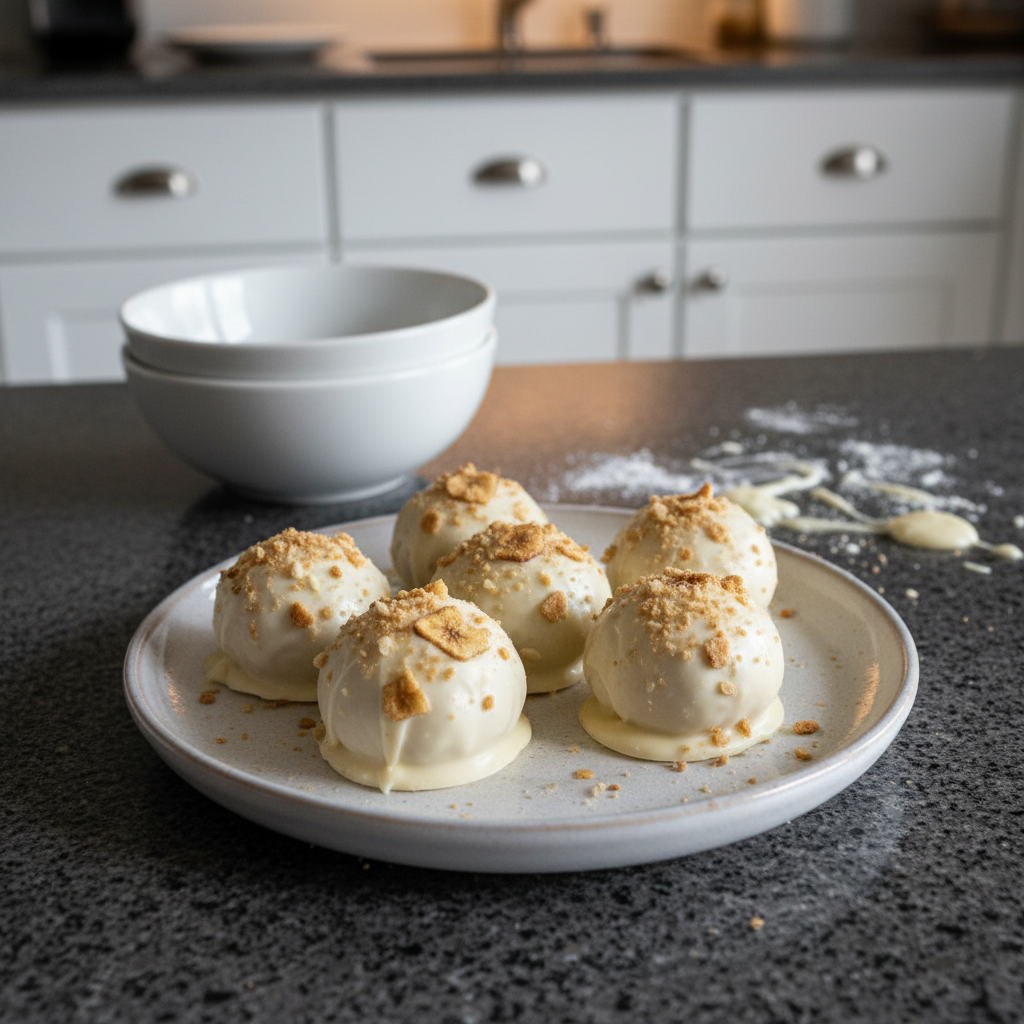
Step 9: Set the Chocolate
Place back in the fridge until chocolate is set. This usually takes about 15-20 minutes.
Step 10: Serve
Serve and enjoy these delicious Banana Pudding Easter Truffles!
Mastering the Chocolate Melt: Tips for a Perfect Dip
Melting chocolate can be tricky, but here’s how to get it right every time:
Double Boiler vs. Microwave: A double boiler provides gentle, even heat, reducing the risk of burning. To use a double boiler, fill a saucepan with a couple inches of water and bring to a simmer. Place a heat-safe bowl on top, ensuring the bottom doesn’t touch the water. Add the chocolate to the bowl and stir occasionally until melted and smooth. The microwave is faster, but requires more attention. Microwave in 30-second intervals, stirring in between, until melted. You may wish to read some information about microwave ovens before you begin.
Preventing Seizing: Chocolate seizes when moisture gets into it. Use a clean, dry bowl and utensils. Avoid overheating the chocolate.
Reviving Seized Chocolate: Sometimes, adding a tablespoon of vegetable oil or shortening can help to smooth it out, but it’s best to avoid seizing in the first place.
Achieving a Smooth, Even Coating: Tempering chocolate results in a glossy, smooth finish. While not essential for this recipe, it elevates the presentation. Ensure the chocolate is fully melted and at the right temperature for dipping.
Pro Tips & Troubleshooting
Pro Tips
- Use ripe, but not overly ripe, bananas to avoid excess moisture.
- Freeze the truffles for the specified time. They must be cold enough to firm up, but not rock-solid.
- Use a high-quality white chocolate that melts smoothly.
- If the batter is too loose, chill it longer before scooping.
- Decorate with festive Easter sprinkles, crushed nuts, or toasted coconut.
- To easily add an Easter theme, dip a fork into the white chocolate and flick white chocolate over the truffles after their first dip.
- Consider placing Cadbury mini eggs on the truffles immediately after dipping them for a festive Easter treat.
Common Mistakes to Avoid
- Using overly ripe bananas, which can make the batter too wet.
- Over-processing the batter, which can result in a gummy texture.
- Overheating the white chocolate, which can cause it to seize.
- Not chilling the truffles long enough before dipping, which can make them difficult to handle.
- Skimping on the banana pudding mix – it’s key for flavor and texture.
- Waiting too long between dipping the truffle and adding your toppings. Add toppings before the chocolate hardens.
Serving & Storage
Serving Ideas
- Serve chilled for the best texture and flavor.
- Pair with coffee, milk, or a dessert wine for a delightful treat.
- Arrange on a festive Easter platter to impress your guests.
- Garnish with extra banana chips or pastel sprinkles for an added touch.
Storage and Make-Ahead
- Refrigerator: Store in an airtight container in the refrigerator for up to 3 days.
- Freezer: Freeze for up to 2 months. Thaw in the refrigerator before serving.
- To prevent the truffles from sticking together during storage, layer them with parchment paper.
- Make the truffles 1-2 days in advance to allow flavors to meld.
Conclusion
These no-bake Banana Pudding Easter Truffles are the perfect combination of easy, delicious, and festive! The banana pudding mix twist takes them to the next level, ensuring a rich banana flavor and a delightful texture. Don’t be afraid to experiment with different decorations and serving ideas to make them your own. Share this recipe with your friends and family and spread the Easter cheer!
If you are looking for another festive dessert, why not try these irresistible strawberries and cream tiramisu?
FAQ
What is the best way to melt white chocolate for dipping? The best way is using a double boiler or microwaving in short intervals, stirring frequently to prevent burning.
How can I prevent the chocolate coating from cracking? Avoid shocking the chocolate with extreme temperature changes. Let the truffles come to near room temperature before serving.
How long do these truffles last, and how should they be stored? They last up to 3 days in the refrigerator or 2 months in the freezer, stored in an airtight container.
Can I use a different type of chocolate or coating? Yes, you can use dark chocolate, milk chocolate, or even candy melts.
What can I substitute for the banana chips? You can use chopped nuts, sprinkles, or toasted coconut.
Can these truffles be frozen? Yes, they freeze well for up to 2 months.
Can I use graham crackers instead of vanilla wafers? Yes, but the flavor will be slightly different.
If I make these a day ahead, should I put them in the refrigerator or leave them room temperature? Always refrigerate them if making ahead of time.
Want another easy no bake recipe? You might like these mini cherry cheesecake shooters!
Banana Pudding Easter Truffles: No-Bake Delight!
Ingredients
Equipment
Method
- Place vanilla wafers in a food processor and pulse until crumbs. You want them to be finely ground. If you don't have a food processor, place them in a ziplock bag and crush them with a rolling pin.
- Add the cream cheese and bananas to the crushed wafers. Make sure your cream cheese is softened, or the mixture will be lumpy.
- Pulse until a stiff batter is formed. The ideal batter consistency should be firm enough to hold its shape. If it's too wet, chill it in the freezer for a bit.
- Scoop out into small balls, approximately 1.5 inches in diameter. Using a cookie scoop ensures uniform size and makes the process easier.
- Freeze for 15 minutes. Chilling is important because it firms them up for dipping, preventing them from melting in the chocolate.
- While the balls are freezing, melt your chocolate in a double boiler on the stove top. This method gently melts the chocolate without burning it. Alternatively, you can use the microwave, but be careful to heat in short intervals and stir frequently.
- Once balls are frozen, dip them in chocolate and place on parchment paper. Work quickly to prevent the chocolate from seizing.
- Add a banana chip on the top. You can also use Easter sprinkles or crushed nuts for alternative decorations.
- Place back in the fridge until chocolate is set. This usually takes about 15-20 minutes.
- Serve and enjoy these delicious Banana Pudding Easter Truffles!
Notes
Lia Monet is a food blogger, recipe developer, and the founder of EasyAsMeals, a food blog focused on easy recipes, quick dinners, and everyday home cooking. She creates tested, family-friendly recipes using simple ingredients to help busy families cook affordable and delicious meals at home.