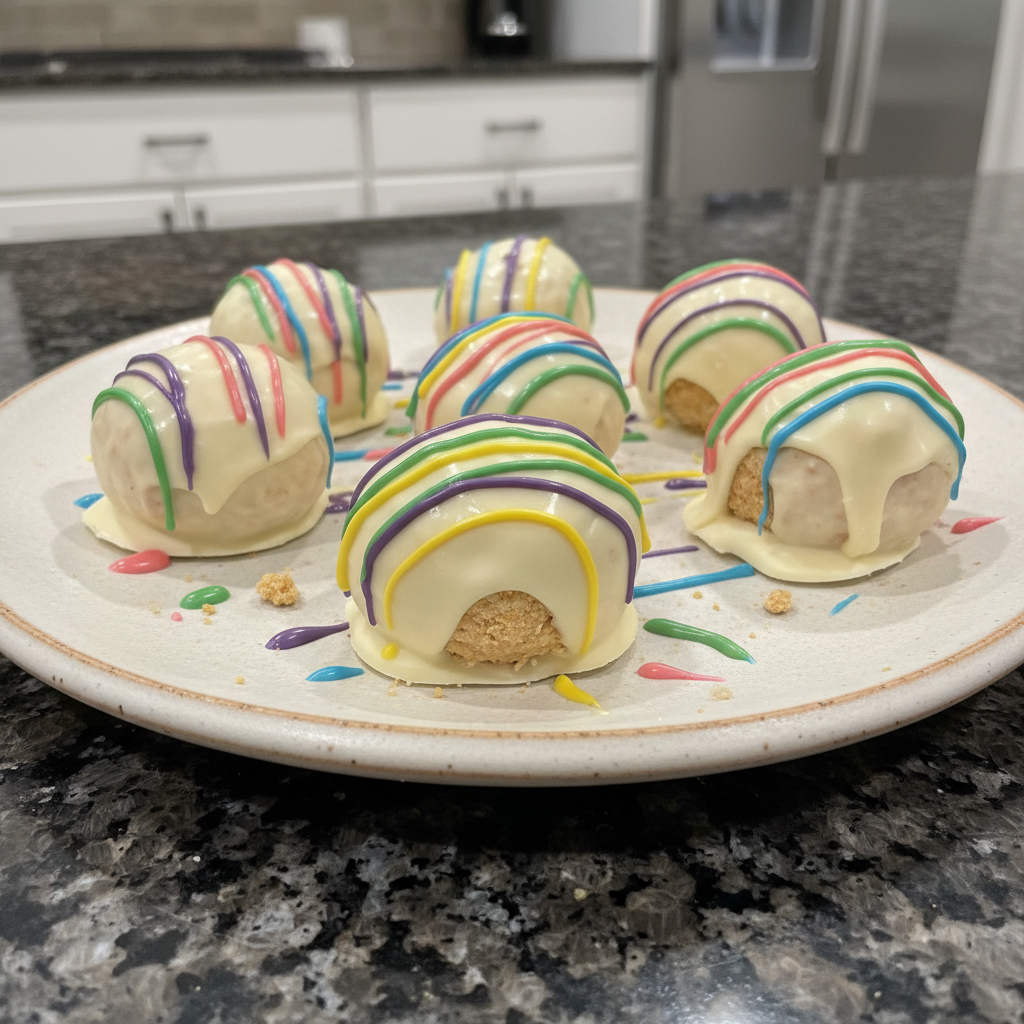
These Easter Oreo truffles are the perfect no-bake treat for your holiday celebrations. Imagine biting into a creamy, white chocolate-covered truffle with a surprising burst of flavor. This recipe is incredibly easy to make, even with little helpers in the kitchen. Get ready to learn how to create these festive and delicious Easter Oreo truffles, complete with a special ingredient that will take them to the next level. The refreshing lemon zest twist in these white chocolate Easter Oreo truffles will elevate the flavor and impress your friends and family. You can learn more about how to zest a lemon properly for this recipe.
Why You’ll Love This Recipe
This recipe offers a delightful twist on classic Oreo truffles. Here’s why you’ll keep coming back to this Easter dessert:
Lemon Zest Magic: The secret ingredient is a small amount of finely grated lemon zest, about 1/2 tsp, added to the Oreo and cream cheese mixture. This brightens the flavor of these Easter Oreo truffles.
Flavor Boost: The lemon zest adds an unexpected citrusy note that perfectly complements the sweet white chocolate and creamy filling. These Easter Oreo truffles are a flavor explosion.
Easy and No-Bake: These Easter Oreo truffles require no baking, making them a quick and simple dessert option for busy holiday schedules. If you’re looking for another easy no-bake dessert, you might enjoy these strawberries and cream tiramisu.
Fun for All Ages: Making these Easter Oreo truffles is a great activity to enjoy with kids, allowing them to get creative with decorating.
Ingredients Needed
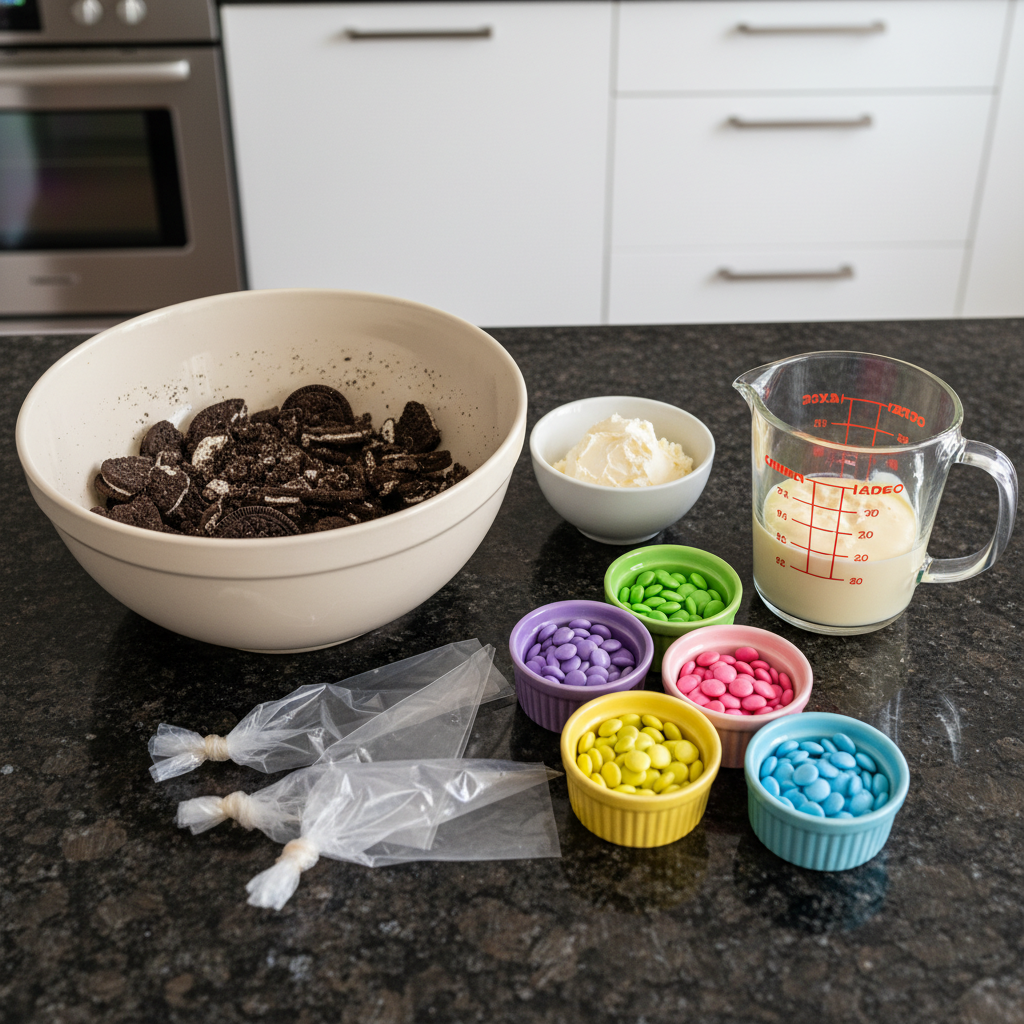
* 1 pack Golden Oreos
* 1 8 oz pack softened cream cheese
* 8 oz semi sweet white chocolate or candy melts
* about 3 oz each purple (, green, yellow, pink and blue candy melts)
* piping bags
Ingredient Notes & Substitutions
Golden Oreos vs. Chocolate Oreos: Golden Oreos offer a milder flavor that pairs well with the white chocolate and lemon zest. Chocolate Oreos can be used for a richer, chocolatey truffle.
Cream Cheese: Full-fat cream cheese is recommended for the best texture and creamy consistency. Make sure the cream cheese is properly softened to ensure a smooth truffle base. You can read more about cream cheese desserts if you’re looking for more recipes.
White Chocolate vs. Candy Melts: White chocolate provides a richer, more authentic chocolate flavor. Candy melts are easier to work with for decorating due to their smooth melting and vibrant colors. Use high-quality white chocolate for best results.
Dairy-Free/Vegan Option: Use dairy-free Oreos and cream cheese alternatives to make these truffles vegan. Dairy-free white chocolate alternatives can be used if available. For another vegan option, consider this vegan pumpkin soup recipe.
How to Make Easter Oreo Truffles White Chocolate
Let’s get started making these delicious Easter Oreo truffles. The combination of white chocolate and lemon will make this recipe a winner.
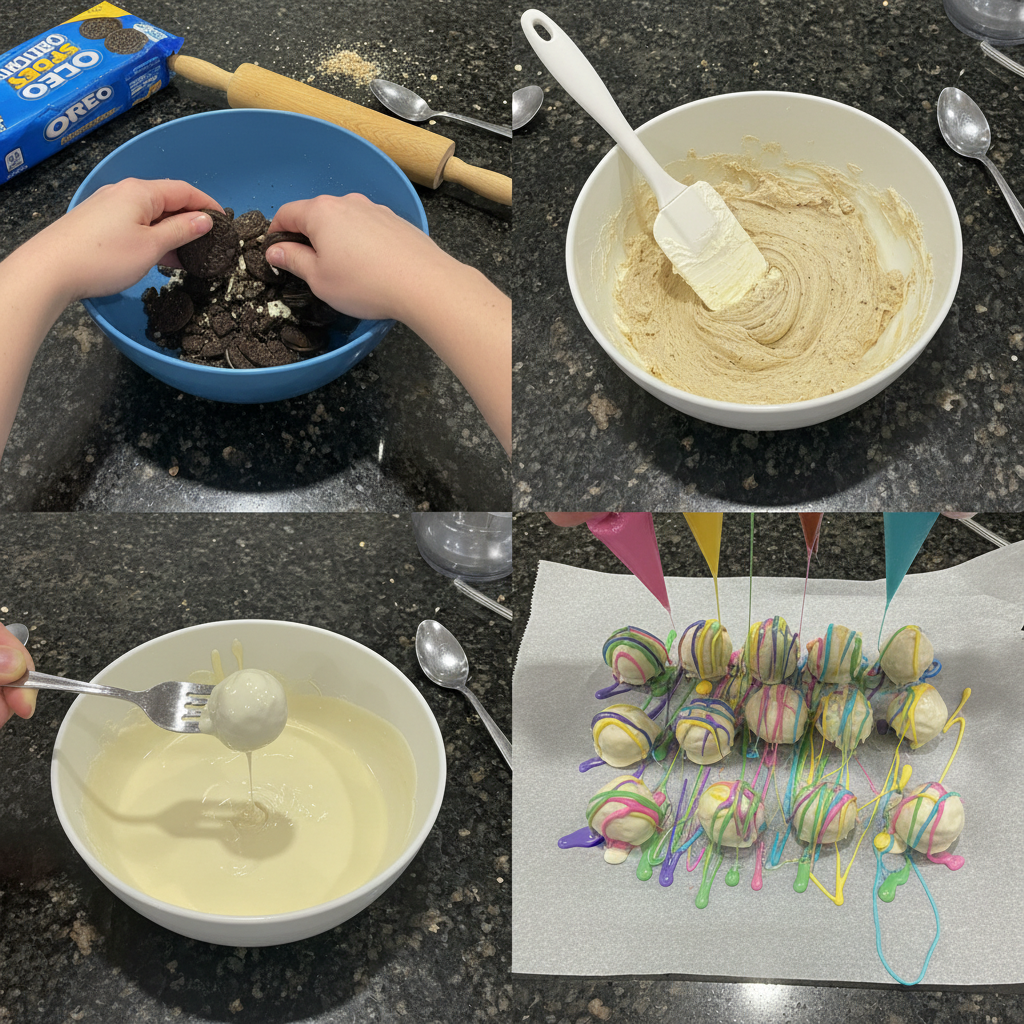
Step 1: Crush the Oreos
In a food processor (powerful blender) pulse Oreos until fine crumbs are formed. The texture should resemble coarse sand. If you don’t have a food processor, you can crush the Oreos in a ziplock bag using a rolling pin.
Step 2: Mix with Cream Cheese
Transfer the Oreo crumbs to a bowl and add softened cream cheese. Mix well to form a soft dough. It’s important that the cream cheese is softened for easy mixing. The dough should be smooth and pliable. Gently fold in the finely grated lemon zest at this stage for that amazing twist.
Step 3: Roll into Truffles
Roll the dough into balls (about 2 Tbsp each) and place them on a tray lined with parchment paper. Using a cookie scoop will ensure uniform truffle sizes.
Step 4: Chill the Truffles
Chill the truffles for at least 15 minutes, until hard. Chilling helps the truffles hold their shape and makes them easier to dip. If the truffles are still soft, chill them for a longer period, like 30 minutes.
Step 5: Melt the White Chocolate
Melt white chocolate in the microwave or a double boiler. To melt in the microwave, heat in 30-second intervals, stirring in between, until smooth. To use a double boiler, place white chocolate in a heat-safe bowl over a pot of simmering water, stirring until melted. Be careful not to overheat the white chocolate, which can cause it to seize.
Step 6: Dip the Truffles
Dip the chilled truffles in the melted white chocolate and then place them on a tray lined with parchment paper. As you dip them, notice the smooth, glossy coating transforming each truffle into a delectable treat. Let them cool completely.
Step 7: Melt and Decorate
Melt colored candy melts (or you can use melted white chocolate colored with gel food coloring) and transfer to piping bags (or zip lock bags). Gel food coloring is recommended over liquid to avoid affecting the consistency of the chocolate.
Step 8: Decorate the Truffles
Quickly, while the chocolate is still melted, decorate the truffles by drizzling different colors or drawing a pattern of your choice. Get creative with sprinkles, edible glitter, or other toppings. Work quickly as the chocolate sets fast.
Step 9: Chill and Store
Keep refrigerated in an air-tight container for up to a week. Refrigeration helps the truffles stay firm and prevents the chocolate from melting.
Mastering the Chocolate Dip
Achieving a smooth, even coating of chocolate can make or break your Easter Oreo truffles. Here’s how:
Achieving a Smooth, Even Coating: Make sure your chocolate is properly melted—smooth and without any lumps. Use a dipping fork or specialized dipping tools. Gently lower the truffle into the chocolate and lift it out, tapping off any excess chocolate against the side of the bowl. Remember to use slow, deliberate movements. If you spot any bare areas, use a toothpick to fill them in.
Troubleshooting Candy Melts: Candy melts can sometimes become too thick if they are overheated or exposed to moisture. To thin candy melts, add a small amount of vegetable shortening or paramount crystals. Avoid adding water, as it can cause the chocolate to seize.
Pro Tips & Troubleshooting
Here are some helpful tips to ensure your Easter Oreo truffles turn out perfectly:
Pro Tips
* Use a fork to dip and tap to remove excess chocolate for a smooth finish.
* Chill the truffles well before dipping to make handling easier.
* Melt the white chocolate slowly and carefully to prevent burning.
* Work quickly when decorating the truffles, as the chocolate sets fast.
* Use gel food coloring for vibrant, consistent colors.
* Store the truffles in an airtight container in the refrigerator to maintain freshness.
* Add the lemon zest for the BEST flavor in these Easter Oreo truffles. Don’t skip this!
* Make sure the Oreos are finely ground for the best truffle texture.
Common Mistakes to Avoid
* Leaving bare spots when dipping the truffles. Take your time and ensure full coverage.
* Not chilling the truffles for long enough before dipping. They should be firm to the touch.
* Overheating the white chocolate, causing it to seize. Use low heat and stir frequently.
* Adding too much liquid to the candy melts, making them too thin.
* Using old or stale Oreos, which can affect the flavor and texture of the truffles.
* Not storing the truffles properly, causing them to melt or dry out.
Serving & Storage
Here’s how to best serve and store your Easter Oreo truffles:
Serving Ideas
* Serve the truffles on a platter for Easter brunch or dessert.
* Wrap the truffles individually as Easter gifts or party favors.
* Pair the truffles with a glass of milk, coffee, or tea.
* Create a festive dessert table with other Easter treats like cupcakes and cookies. For another great dessert idea, consider these romantic Valentine meringue cookies for a floral twist.
Storage and Make-Ahead
* Store the truffles in an airtight container in the refrigerator for up to a week.
* The truffles can be frozen for up to 2 months. Thaw in the refrigerator before serving.
* The truffle base can be made ahead of time and stored in the refrigerator for up to 2 days before dipping.
Conclusion
These Easter Oreo truffles are not only easy to make but also incredibly delicious, thanks to the bright lemon zest that adds a special touch. This unique flavor boost makes them a memorable Easter treat. With this simple recipe, even beginner bakers can create impressive and delightful desserts. Don’t hesitate to experiment with different Oreo flavors or chocolate types to make them your own. Print the recipe and share it with your friends and family this Easter! If you’re looking for more fun and festive recipes, why not try making these Red Velvet Cupcakes with a Raspberry Secret?
FAQ
Here are some frequently asked questions about making Easter Oreo truffles:
What is the best way to dip the truffles smoothly?
Use a dipping fork or specialized tools and gently lower the truffle into the melted chocolate. Tap off excess chocolate against the side of the bowl for a smooth, even coating.
How can I prevent the candy melts from seizing or becoming too thick?
Melt the candy melts slowly and carefully, using low heat. Avoid overheating them or adding water, which can cause them to seize. If they become too thick, add a small amount of vegetable shortening or paramount crystals.
How long will the Oreo truffles last in the refrigerator, and can they be frozen?
The Oreo truffles will last for up to a week in the refrigerator and can be frozen for up to 2 months. Thaw in the refrigerator before serving.
Can I use different Oreo flavors or chocolate types for this recipe?
Yes, you can experiment with different Oreo flavors, such as chocolate or peanut butter. You can also use dark chocolate or milk chocolate instead of white chocolate. Adjust candy melt colors accordingly.
What are some tips for creating decorative designs with the candy melts?
Use piping bags or zip-lock bags with a small hole cut in the corner to drizzle different colors of candy melts onto the truffles. You can also use sprinkles, edible glitter, or other toppings to create festive designs.
How can I make these truffles vegan?
Use dairy-free Oreos and cream cheese alternatives. Look for dairy-free white chocolate alternatives or use a vegan chocolate coating. Note that availability of vegan candy melts may vary.
How do I prevent bare spots when dipping the truffles?
Ensure the chocolate is fully melted and smooth. Dip the truffles completely, and use a toothpick to fill in any gaps or holes in the coating. Tap gently to remove excess chocolate and ensure an even coat. For a truly perfect finish, you might also enjoy learning how to make candied grapefruit peel for garnish.
Easter Oreo Truffles: Easy White Chocolate Recipe
Ingredients
Equipment
Method
- In a food processor (powerful blender) pulse Oreos until fine crumbs are formed. The texture should resemble coarse sand. If you don’t have a food processor, you can crush the Oreos in a ziplock bag using a rolling pin.
- Transfer the Oreo crumbs to a bowl and add softened cream cheese. Mix well to form a soft dough. It's important that the cream cheese is softened for easy mixing. The dough should be smooth and pliable. Gently fold in the finely grated lemon zest at this stage for that amazing twist.
- Roll the dough into balls (about 2 Tbsp each) and place them on a tray lined with parchment paper. Using a cookie scoop will ensure uniform truffle sizes.
- Chill the truffles for at least 15 minutes, until hard. Chilling helps the truffles hold their shape and makes them easier to dip. If the truffles are still soft, chill them for a longer period, like 30 minutes.
- Melt white chocolate in the microwave or a double boiler. To melt in the microwave, heat in 30-second intervals, stirring in between, until smooth. To use a double boiler, place white chocolate in a heat-safe bowl over a pot of simmering water, stirring until melted. Be careful not to overheat the white chocolate, which can cause it to seize.
- Dip the chilled truffles in the melted white chocolate and then place them on a tray lined with parchment paper. As you dip them, notice the smooth, glossy coating transforming each truffle into a delectable treat. Let them cool completely.
- Melt colored candy melts (or you can use melted white chocolate colored with gel food coloring) and transfer to piping bags (or zip lock bags). Gel food coloring is recommended over liquid to avoid affecting the consistency of the chocolate.
- Quickly, while the chocolate is still melted, decorate the truffles by drizzling different colors or drawing a pattern of your choice. Get creative with sprinkles, edible glitter, or other toppings. Work quickly as the chocolate sets fast.
- Keep refrigerated in an air-tight container for up to a week. Refrigeration helps the truffles stay firm and prevents the chocolate from melting.